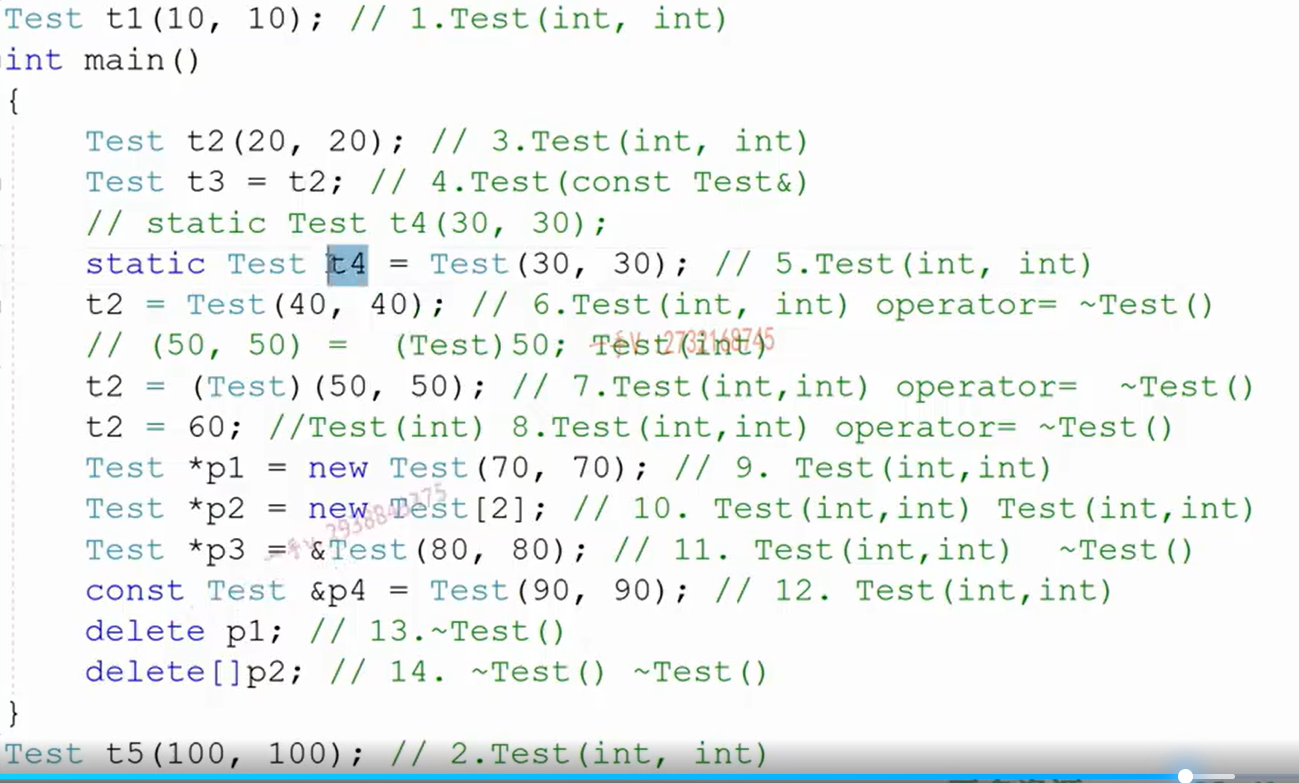
施磊C++ | 进阶学习笔记 一、对象的应用优化、右值引用的优化 1.1 构造,拷贝,赋值,析构中的优化 1 2 3 4 5 6 7 8 9 10 11 12 13 14 15 16 17 18 19 20 21 22 23 24 25 26 27 28 29 30 31 32 33 34 35 36 37 38 39 40 41 42 43 44 45 46 47 48 49 50 51 52 53 #include <iostream> using namespace std;class test { public : test (int a = 10 ) :ma (a) { cout << "test(int)" << endl; } ~test () { cout << "~test" << endl; } test (const test& t) :ma (t.ma) { cout << "test(const &)" << endl; } test& operator =(const test& t) { cout << "operator=" << endl; ma = t.ma; return *this ; } private : int ma; }; int main () test t1; test t2 (t1) ; test t3 = t1; test t4 = test (20 ); cout << "--------" << endl; t4 = t2; t4 = test (30 ); t4 = (test)30 ; t4 = 30 ; test* p = &test (40 ); const test& ref = test (50 ); return 0 ; }
课后练习:
1.2 函数调用过程中对象背后调用的方法 1 2 3 4 5 6 7 8 9 10 11 12 13 14 15 16 17 18 19 20 21 22 23 24 25 26 27 28 29 30 31 32 33 34 35 36 37 38 39 40 41 42 43 #include <iostream> using namespace std;class test { public : test (int a = 10 ) :ma (a) { cout << "test(int)" << endl; } ~test () { cout << "~test" << endl; } test (const test& t) :ma (t.ma) { cout << "test(const &)" << endl; } test& operator =(const test& t) { cout << "operator=" << endl; ma = t.ma; return *this ; } int getData () const return ma; } private : int ma; }; test GetObject (test t) int val = t.getData (); test tmp (val) ; return tmp; } int main () test t1; test t2; t2 = GetObject (t1); return 0 ; }
1.3 对象优化三原则 1.函数参数传递过程中,对象优先按引用传递,不要按照值传递(实参到形参不需要构造和析构函数调用)
2.函数返回对象的时候,优先考虑返回一个临时对象,而不是一个定义过的对象
1 2 3 4 5 6 test GetObject (test &t) int val = t.getData (); return test (val); }
3.接收函数返回值是对象的函数调用的时候,优先按初始化的方式接收,不要按复制的方式接收
1 2 3 4 5 6 7 8 9 10 11 12 13 14 15 16 17 18 19 20 21 22 23 24 25 26 27 28 29 30 31 32 33 34 35 36 37 38 39 #include <iostream> using namespace std;class test { public : test (int a = 10 ) :ma (a) { cout << "test(int)" << endl; } ~test () { cout << "~test" << endl; } test (const test& t) :ma (t.ma) { cout << "test(const &)" << endl; } test& operator =(const test& t) { cout << "operator=" << endl; ma = t.ma; return *this ; } int getData () const return ma; } private : int ma; }; test GetObject (test &t) int val = t.getData (); test tmp (val) ; return tmp; } int main () test t1; test t2 = GetObject (t1); return 0 ; }
1.4 右值引用、move移动语意、完美转发 请转至C++11 新特性 学习笔记-CSDN博客 进行学习
二、智能指针 2.1智能指针介绍 学习C++的人,一直在接触裸指针,一边感受着它的强大,一边感受着它的坑爹。当然,坑不坑爹在于开发者,指针本身近乎完美,但奈何用的人比较猥琐,给自己埋下无数的坑,还哭喊着指针不好用,那么今天要介绍的智能指针可以释放大家在使用裸指针时的一些压力,当然智能指针无法替代裸指针的全部功能。
裸指针到底有什么不好,写过一些C++代码的人应该都能知道,比如下面的原因:
忘记释放资源,导致资源泄露(常发生内存泄漏问题)
同一资源释放多次,导致释放野指针,程序崩溃
明明代码的后面写了释放资源的代码,但是由于程序逻辑满足条件,从中间return掉了,导致释放资源的代码未被执行到,懵
代码运行过程中发生异常,随着异常栈展开,导致释放资源的代码未被执行到,懵
总之,智能指针的智能 二字,主要体现在用户可以不关注资源的释放,因为智能指针会帮你完全管理资源的释放,它会保证无论程序逻辑怎么跑,正常执行或者产生异常,资源在到期的情况下,一定会进行释放。
C++11库里面,提供了带引用计数的智能指针和不带引用计数的智能指针 ,这篇文章主要介绍它们的原理和应用场景,包括auto_ptr,scoped_ptr,unique_ptr,shared_ptr,weak_ptr 。
2.2自己实现智能指针(基础知识) 为了更好的理解C++库中智能指针的原理,我们首先需要自己实现一个简单的智能指针,窥探一下智能指针的基本原理,就是利用栈上的对象出作用域会自动析构 这么一个特点,把资源释放的代码全部放在这个析构函数中执行,就达到了所谓的智能 指针。对比下面的两块代码:
使用裸指针
1 2 3 4 5 6 7 8 9 10 11 int main () int *p = new int ; delete p; return 0 ; }
2.使用智能指针
1 2 3 4 5 6 7 8 9 10 11 12 13 14 15 16 17 18 19 20 template <typename T>class CSmartPtr { public : CSmartPtr (T *ptr = nullptr ) :mptr (ptr) {} ~CSmartPtr () { delete mptr; } private : T *mptr; }; int main () CSmartPtr<int > ptr (new int ) ; return 0 ; }
上面这段代码就是一个非常简单的智能指针,主要用到了这两点:智能指针体现在把裸指针进行了一次面向对象的封装,在构造函数中初始化资源地址,在析构函数中负责释放资源 利用栈上的对象出作用域自动析构这个特点,在智能指针的析构函数中保证释放资源
所以,智能指针一般都是定义在栈上的,曾经有一个面试问题,问“能不能在堆上定义智能指针? ”,如这段代码CSmartPtr *p = new CSmartPtr(new int) ;大家应该能看出来,这里定义的p虽然是智能指针类型,但它实质上还是一个裸指针,因此p还是需要进行手动delete,又回到了最开始裸指针我们面临的问题,那还不如一开始就用裸指针算了。
当然,智能指针要做到和裸指针相似,还得提供裸指针常见的*和->两种运算符的重载函数 ,使用起来才真正的和裸指针一样,代码扩充如下:
1 2 3 4 5 6 7 8 9 10 11 12 13 14 15 16 17 18 19 20 21 22 template <typename T>class CSmartPtr { public : CSmartPtr (T *ptr = nullptr ) :mptr (ptr) {} ~CSmartPtr () { delete mptr; } T& operator *() { return *mptr; } const T& operator *()const { return *mptr; } T* operator ->() { return mptr; } const T* operator ->()const { return mptr; } private : T *mptr; }; int main () CSmartPtr<int > ptr (new int ) ; *ptr = 20 ; cout << *ptr << endl; return 0 ; }
注:
上面的这个智能指针,使用起来就和普通的裸指针非常相似了,但是它还存在很大的问题,看下面的代码:
1 2 3 4 5 6 int main () CSmartPtr<int > ptr1 (new int ) ; CSmartPtr<int > ptr2 (ptr1) ; return 0 ; }
这个main函数运行,代码直接崩溃,问题出在默认的拷贝构造函数做的是浅拷贝,两个智能指针都持有一个new int资源,ptr2先析构释放了资源,到ptr1析构的时候,就成了delete野指针了,造成程序崩溃 。所以这里引出来智能指针需要解决的两件事情:
怎么解决智能指针的浅拷贝问题
多个智能指针指向同一个资源的时候,怎么保证资源只释放一次,而不是每个智能指针都释放一次,造成代码运行不可预期的严重后果
我们一起看看C++库中提供的智能指针是怎么解决上面提到的问题的。
2.3不带引用计数的智能指针 C++库中提供的不带引用计数的智能指针主要包括:auto_ptr(C++库),scoped_ptr(C++11),unique_ptr(C++11) ,下面一一进行介绍。
1.auto_ptr 先浏览一下auto_ptr的主要源码,如下:
1 2 3 4 5 6 7 8 9 10 11 12 13 14 15 16 17 18 19 20 21 22 23 24 25 26 27 28 29 template <class _Ty > class auto_ptr { public : typedef _Ty element_type; explicit auto_ptr (_Ty * _Ptr = nullptr ) noexcept : _Myptr(_Ptr) { } auto_ptr (auto_ptr& _Right) noexcept : _Myptr(_Right.release ()) { } _Ty * release () noexcept { _Ty * _Tmp = _Myptr; _Myptr = nullptr ; return (_Tmp); } private : _Ty * _Myptr; };
从auto_ptr的源码可以看到,指向同一块内存的智能指针只有最新构造的一个auto_ptr智能指针持有资源,原来具有相同资源的的auto_ptr在新的aotu_ptr构造的时候都被赋nullptr了,不再管理资源,考虑如下代码:
1 2 3 4 5 6 7 8 9 10 11 12 int main () auto_ptr<int > p1 (new int ) ; auto_ptr<int > p2 = p1; *p1 = 10 ; return 0 ; }
上面的程序,如果用户不了解auto_ptr的实现,代码就会出现严重的问题。记得曾经一个面试题问过“auto_ptr能不能使用在容器当中? ”,看下面的代码描述:
1 2 3 4 5 6 7 8 9 10 11 12 13 14 15 16 int main () vector<auto_ptr<int >> vec; vec.push_back (auto_ptr <int >(new int (10 ))); vec.push_back (auto_ptr <int >(new int (20 ))); vec.push_back (auto_ptr <int >(new int (30 ))); cout << *vec[0 ] << endl; vector<auto_ptr<int >> vec2 = vec; cout << *vec[0 ] << endl; return 0 ; }
所以不要在容器中使用auto_ptr,C++建议最好不要使用auto_ptr ,除非应用场景非常简单。
【总结】:auto_ptr智能指针不带引用计数,那么它处理浅拷贝的问题,是直接把前面的auto_ptr都置为nullptr,只让最后一个auto_ptr持有资源。 (也可以理解为这个指针会转交资源的管理权)
2.scoped_ptr 先浏览一下scoped_ptr的源码,如下:
1 2 3 4 5 6 7 8 9 10 11 12 13 14 15 16 17 18 19 20 21 22 23 24 25 26 27 28 29 30 31 32 33 34 35 36 37 38 39 40 41 42 43 44 45 46 47 48 49 50 51 template <class T > class scoped_ptr { private : T * px; scoped_ptr (scoped_ptr const &); scoped_ptr & operator =(scoped_ptr const &); typedef scoped_ptr<T> this_type; void operator ==( scoped_ptr const & ) const ; void operator !=( scoped_ptr const & ) const ; public : typedef T element_type; explicit scoped_ptr ( T * p = 0 ) : px( p ) // never throws { #if defined(BOOST_SP_ENABLE_DEBUG_HOOKS) boost::sp_scalar_constructor_hook ( px ); #endif } #ifndef BOOST_NO_AUTO_PTR explicit scoped_ptr ( std::auto_ptr<T> p ) BOOST_NOEXCEPT : px( p.release() ) { #if defined(BOOST_SP_ENABLE_DEBUG_HOOKS) boost::sp_scalar_constructor_hook ( px ); #endif } #endif ~scoped_ptr () { #if defined(BOOST_SP_ENABLE_DEBUG_HOOKS) boost::sp_scalar_destructor_hook ( px ); #endif boost::checked_delete ( px ); } };
从scoped_ptr的源码可以看到,该智能指针由于私有化了拷贝构造函数和operator=赋值函数,因此从根本上杜绝了智能指针浅拷贝的发生,所以scoped_ptr也是不能用在容器当中的,如果容器互相进行拷贝或者赋值,就会引起scoped_ptr对象的拷贝构造和赋值,这是不允许的,代码会提示编译错误 。
也可以理解为他把拷贝构造和赋值重载设置为delete了。
1 2 scoped_ptr (const scoped_ptr<T>&) = delete ;scoped_ptr<T>& operator =(const scoped_ptr<T>&) = delete ;
auto_ptr和scoped_ptr这一点上的区别,有些资料上用所有权 的概念来描述,道理是相同的,auto_ptr可以任意转移资源的所有权,而scoped_ptr不会转移所有权 (因为拷贝构造和赋值被禁止了)。
3.unique_ptr 先看看unique_ptr的部分源码如下:
1 2 3 4 5 6 7 8 9 10 11 12 13 14 15 16 17 18 19 20 21 22 23 24 25 26 27 28 29 30 31 32 33 34 35 36 37 38 39 40 41 42 43 44 45 46 47 48 49 50 51 52 53 54 55 56 57 58 59 60 61 62 63 64 65 66 67 68 69 70 71 72 73 74 75 76 77 78 79 80 81 82 83 84 85 86 87 88 89 90 91 92 93 template <class _Ty , class _Dx > class unique_ptr : public _Unique_ptr_base<_Ty, _Dx> { public : typedef _Unique_ptr_base<_Ty, _Dx> _Mybase; typedef typename _Mybase::pointer pointer; typedef _Ty element_type; typedef _Dx deleter_type; unique_ptr (unique_ptr&& _Right) noexcept : _Mybase(_Right.release (), _STD forward<_Dx>(_Right.get_deleter ())) { } unique_ptr& operator =(unique_ptr&& _Right) noexcept { if (this != _STD addressof (_Right)) { reset (_Right.release ()); this ->get_deleter () = _STD forward<_Dx>(_Right.get_deleter ()); } return (*this ); } void swap (unique_ptr& _Right) noexcept { _Swap_adl(this ->_Myptr(), _Right._Myptr()); _Swap_adl(this ->get_deleter (), _Right.get_deleter ()); } ~unique_ptr () noexcept { if (get () != pointer ()) { this ->get_deleter ()(get ()); } } _NODISCARD pointer operator ->() const noexcept { return (this ->_Myptr()); } _NODISCARD pointer get () const noexcept { return (this ->_Myptr()); } explicit operator bool () const noexcept { return (get () != pointer ()); } pointer release () noexcept { pointer _Ans = get (); this ->_Myptr() = pointer (); return (_Ans); } void reset (pointer _Ptr = pointer()) noexcept { pointer _Old = get (); this ->_Myptr() = _Ptr; if (_Old != pointer ()) { this ->get_deleter ()(_Old); } } unique_ptr (const unique_ptr&) = delete ; unique_ptr& operator =(const unique_ptr&) = delete ; };
从上面看到,unique_ptr有一点和scoped_ptr做的一样,就是去掉了拷贝构造函数和operator=赋值重载函数,禁止用户对unique_ptr进行显示的拷贝构造和赋值,防止智能指针浅拷贝问题的发生 。
但是unique_ptr提供了带右值引用参数的拷贝构造和赋值 ,也就是说,unique_ptr智能指针可以通过右值引用进行拷贝构造和赋值操作,或者在产生unique_ptr临时对象的地方,如把unique_ptr作为函数的返回值时,示例代码如下:
1 2 3 4 5 6 7 8 9 10 11 12 13 14 15 16 17 18 19 20 unique_ptr<int > ptr (new int ) ;unique_ptr<int > ptr2 = std::move (ptr); ptr2 = std::move (ptr); unique_ptr<int > test_uniqueptr () unique_ptr<int > ptr1 (new int ) ; return ptr1; } int main () unique_ptr<int > ptr = test_uniqueptr (); return 0 ; }
unique_ptr也是auto_ptr一样,只有最后一个指针有资源管理权,但这个是通过move实现的,不是将原来的指针置为空,原来的unique_ptr也不能管理资源,只有最新的一个可以。
unique_ptr还提供了reset重置资源,swap交换资源等函数,也经常会使用到。可以看到,unique_ptr从名字就可以看出来,最终也是只能有一个该智能指针引用资源,因此建议在使用不带引用计数的智能指针时,可以优先选择unique_ptr智能指针 。
4.三个指针对比
有没有拷贝和赋值重载
哪个指针管理内存资源
可以赋值吗
auto
有,并且可用
指向同一块内存的指针只有最新的指针才能管理内存
可以,但是原来的指针被赋值为nullptr
scoped
有,但是被设为私有,不能用
指向同一块内存的指针只有最新的指针才能管理内存
不可以,直接是不允许的行为
unique
有,但是被设置为delete了,不能用
指向同一块内存的指针只有最新的指针才能管理内存
不可以用左值赋值,但可以通过move转为右值赋值
2.4带引用计数的智能指针shared_ptr、weak_ptr 这里主要介绍shared_ptr和weak_ptr两个智能指针,什么是带引用计数的智能指针 ?当允许多个智能指针指向同一个资源的时候,每一个智能指针都会给资源的引用计数加1,当一个智能指针析构时,同样会使资源的引用计数减1,这样最后一个智能指针把资源的引用计数从1减到0时,就说明该资源可以释放了 ,由最后一个智能指针的析构函数来处理资源的释放问题,这就是引用计数的概念。
要对资源的引用个数进行计数,那么大家知道,对于整数的++或者- -操作,它并不是线程安全的操作,因此shared_ptr和weak_ptr底层的引用计数已经通过CAS操作,保证了引用计数加减的原子特性,因此shared_ptr和weak_ptr本身就是线程安全的带引用计数的智能指针 。
曾经有一道面试的问题这样问“shared_ptr智能指针的引用计数在哪里存放? ”,当然,这个问题需要看shared_ptr的源码了,如下:
1 2 3 4 5 6 7 private : element_type * _Ptr{nullptr }; _Ref_count_base * _Rep{nullptr };
因此,shared_ptr智能指针的资源引用计数器在内存的heap堆上 。shared_ptr一般被称作强智能指针 ,weak_ptr被称作弱智能指针 ,它们有下边两个非常重要的应用场景需要注意。
强:可以改变资源的引用计数
弱:不能改变资源的引用计数
2.5智能指针的交叉引用(循环引用)问题 请看下面的这个代码示例:
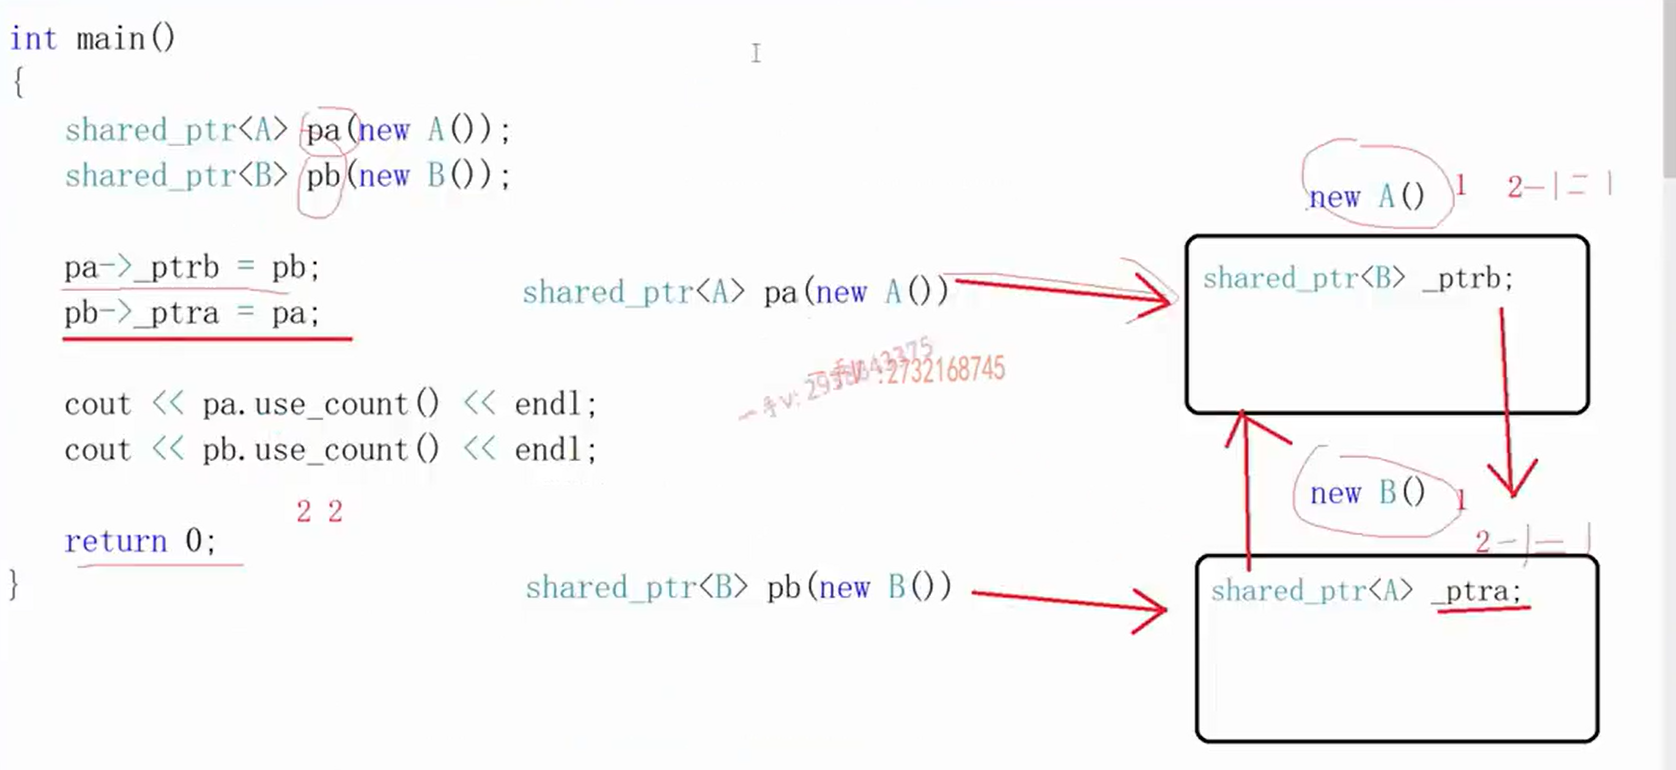
1 2 3 4 5 6 7 8 9 10 11 12 13 14 15 16 17 18 19 20 21 22 23 24 25 26 27 28 29 30 31 32 33 34 35 36 37 #include <iostream> #include <memory> using namespace std;class B ; class A { public : A () { cout << "A()" << endl; } ~A () { cout << "~A()" << endl; } shared_ptr<B> _ptrb; }; class B { public : B () { cout << "B()" << endl; } ~B () { cout << "~B()" << endl; } shared_ptr<A> _ptra; }; int main () shared_ptr<A> ptra (new A()) ; shared_ptr<B> ptrb (new B()) ; ptra->_ptrb = ptrb; ptrb->_ptra = ptra; cout << ptra.use_count () << endl; cout << ptrb.use_count () << endl; return 0 ; }
代码打印结果:资源无法释放 ,那怎么解决这个问题呢?请注意强弱智能指针的一个重要应用规则:定义对象时,用强智能指针shared_ptr,在其它地方引用对象时,使用弱智能指针weak_ptr 。
注解:这句话的意思是,在创建或分配一个对象时,应该使用std::shared_ptr来管理这个对象的生命周期。而在需要引用这个对象,但又不想拥有它(即不想影响它的生命周期)的地方,应该使用std::weak_ptr。
在这里,“引用对象”指的是在代码中创建或获取一个指向某个对象的引用或指针,以便能够访问该对象的成员(属性或方法)。
弱智能指针weak_ptr区别于shared_ptr之处在于 :
weak_ptr不会改变资源的引用计数,只是一个观察者的角色,通过观察shared_ptr来判定资源是否存在
weak_ptr持有的引用计数,不是资源的引用计数,而是同一个资源的观察者的计数
weak_ptr没有提供常用的指针操作,无法直接访问资源,需要先通过lock方法提升为shared_ptr强智能指针,才能访问资源
那么上面的代码怎么修改,也就是如何解决带引用计数的智能指针的交叉引用问题 ,代码如下:
1 2 3 4 5 6 7 8 9 10 11 12 13 14 15 16 17 18 19 20 21 22 23 24 25 26 27 28 29 30 31 32 33 34 35 36 37 38 39 #include <iostream> #include <memory> using namespace std;class B ; class A { public : A () { cout << "A()" << endl; } ~A () { cout << "~A()" << endl; } weak_ptr<B> _ptrb; }; class B { public : B () { cout << "B()" << endl; } ~B () { cout << "~B()" << endl; } weak_ptr<A> _ptra; }; int main () shared_ptr<A> ptra (new A()) ; shared_ptr<B> ptrb (new B()) ; ptra->_ptrb = ptrb; ptrb->_ptra = ptra; cout << ptra.use_count () << endl; cout << ptrb.use_count () << endl; return 0 ; }
代码打印如下:
weak没有重载*和->运算符,不能完全替代裸指针的功能
1 2 3 4 5 6 7 8 9 10 11 12 13 14 15 16 17 18 19 20 21 22 23 24 25 26 27 28 29 30 31 32 33 34 35 36 37 38 39 40 41 42 43 44 #include <iostream> #include <memory> using namespace std;class B ; class A { public : A () { cout << "A()" << endl; } ~A () { cout << "~A()" << endl; } weak_ptr<B> _ptrb; void testA () }; class B { public : B () { cout << "B()" << endl; } ~B () { cout << "~B()" << endl; } weak_ptr<A> _ptra; void func () { shared_ptr<A> ps=_ptra.lock (); if (ps!=nullptr ) ps->testA (); } }; int main () shared_ptr<A> ptra (new A()) ; shared_ptr<B> ptrb (new B()) ; ptra->_ptrb = ptrb; ptrb->_ptra = ptra; cout << ptra.use_count () << endl; cout << ptrb.use_count () << endl; return 0 ; }
2.6多线程访问共享对象问题 有一个用C++写的开源网络库,muduo库,作者陈硕,大家可以在网上下载到muduo的源代码,该源码中对于智能指针的应用非常优秀,其中借助shared_ptr和weak_ptr解决了这样一个问题,多线程访问共享对象的线程安全问题 ,解释如下:线程A和线程B访问一个共享的对象,如果线程A正在析构这个对象的时候,线程B又要调用该共享对象的成员方法,此时可能线程A已经把对象析构完了,线程B再去访问该对象,就会发生不可预期的错误。
先看如下代码:
1 2 3 4 5 6 7 8 9 10 11 12 13 14 15 16 17 18 19 20 21 22 23 24 25 26 27 28 29 30 31 32 33 34 35 36 37 38 39 40 41 42 43 44 45 46 47 48 49 50 #include <iostream> #include <thread> using namespace std;class Test { public : Test () :_ptr(new int (20 )) { cout << "Test()" << endl; } ~Test () { delete _ptr; _ptr = nullptr ; cout << "~Test()" << endl; } void show () { cout << *_ptr << endl; } private : int *volatile _ptr; }; void threadProc (Test *p) std::this_thread::sleep_for (std::chrono::seconds (2 )); p->show (); } int main () Test *p = new Test (); std::thread t1 (threadProc, p) ; delete p; t1. join (); return 0 ; }
运行上面的代码,发现在main主线程已经delete析构Test对象以后,子线程threadProc再去访问Test对象的show方法,无法打印出 _ptr的值20
1 2 3 4 5 6 7 8 9 10 11 12 13 14 15 16 17 18 19 20 21 22 23 24 25 26 27 28 29 30 31 32 33 34 35 36 37 38 39 40 41 42 43 44 45 46 47 48 49 50 51 52 53 54 55 #include <iostream> #include <thread> #include <memory> using namespace std;class Test { public : Test () :_ptr(new int (20 )) { cout << "Test()" << endl; } ~Test () { delete _ptr; _ptr = nullptr ; cout << "~Test()" << endl; } void show () { cout << *_ptr << endl; } private : int *volatile _ptr; }; void threadProc (weak_ptr<Test> pw) std::this_thread::sleep_for (std::chrono::seconds (2 )); shared_ptr<Test> ps = pw.lock (); if (ps != nullptr ) { ps->show (); } } int main () shared_ptr<Test> p (new Test) ; std::thread t1 (threadProc, weak_ptr<Test>(p)) ; t1. join (); return 0 ; }
运行上面的代码,show方法可以打印出20,因为main线程调用了t1.join()方法等待子线程结束,此时pw通过lock提升为ps成功 ,见上面代码示例。
如果设置t1为分离线程,让main主线程结束,p智能指针析构,进而把Test对象析构,此时show方法已经不会被调用,因为在threadProc方法中,pw提升到ps时,lock方法判定Test对象已经析构,提升失败 !main函数代码可以如下修改测试:
1
2
3
4
5
6
7
8
9
10
11
int main () shared_ptr<Test> p (new Test) ; std::thread t1 (threadProc, weak_ptr<Test>(p)) ; t1. detach (); return 0 ; }
该main函数运行后,最终的threadProc中,show方法不会被执行到。以上是在多线程中访问共享对象时,对shared_ptr和weak_ptr的一个典型应用 。
2.7自定义删除器 我们经常用智能指针管理的资源是堆内存,当智能指针出作用域的时候,在其析构函数中会delete释放堆内存资源,但是除了堆内存资源,智能指针还可以管理其它资源,比如打开的文件,此时对于文件指针的关闭,就不能用delete了,这时我们需要自定义智能指针释放资源的方式,先看看unique_ptr智能指针的析构函数代码,如下:
1 2 3 4 5 6 7 ~unique_ptr () noexcept { if (get () != pointer ()) { this ->get_deleter ()(get ()); } }
从unique_ptr的析构函数可以看到,如果要实现一个自定义的删除器,实际上就是定义一个函数对象(重载的调用运算符())而已,示例代码如下:
1 2 3 4 5 6 7 8 9 10 11 12 13 14 15 16 17 18 19 20 21 22 23 24 25 26 27 28 29 30 31 32 33 #include <iostream> #include <memory> #include <thread> #include <functional> using namespace std;template <typename T>class MyDeletor { public : void operator () (T *ptr) const { cout << "call MyDeletor.operator()" << endl; delete []ptr; } }; template <typename T>class MyFileDeletor { public : void operator () (T *ptr) const { cout << "call MyFileDeletor.operator()" << endl; fclose (ptr); } }; int main () unique_ptr<int , MyDeletor<int >> ptr1 (new int [100 ]); unique_ptr<FILE, MyFileDeletor<FILE>> ptr2 (fopen ("data,txt" , "w" )); return 0 ; }
当然这种方式需要定义额外的函数对象类型,不推荐,可以用C++11提供的函数对象function和lambda表达式更好的处理自定义删除器,代码如下:
1 2 3 4 5 6 7 8 9 10 11 12 13 14 15 16 int main () unique_ptr<int , function<void (int *)>> ptrl (new int [100 ], [] (int *p) ->void { cout << "call lambda release new int[100]" << endl; delete []p; } ); unique_ptr<FILE, function<void (FILE*)>> ptr2 (fopen ("data.txt" , "w" ), [] (FILE *p) ->void { cout << "call lambda release new fopen" << endl; fclose (p); } ); }
三、绑定器和函数对象、lambda表达式 3.1模板的完全特例化和非完全(部分)特例化 1.完全特例化和非完全(部分)特例化 1 2 3 4 5 6 7 8 9 10 11 12 13 14 15 16 template <typename T>class Vector { public : Vector () { cout << "call Vector template init" << endl; } }; template <>class Vector <char *>{ public : Vector () { cout << "call Vector<char*> init" << endl; } };
1 2 3 4 5 6 7 template <typename T>class Vector <T*>{ public : Vector () { cout << "call Vector<T*> init" << endl; } };
1 2 3 4 5 6 7 8 9 10 11 12 13 14 15 16 17 18 19 20 template <typename R,typename A1,typename A2>class Vector <R (*)(A1,A2)>{ public : Vector () { cout << "call Vector<R(*)(A1,A2)> init" << endl; } }; template <>class Vector <int (*)(int ,int )> template <typename R,typename A1,typename A2>class Vector <R (A1,A2)>{ public : Vector () { cout << "call Vector<R(A1,A2)> init" << endl; } };
1 int sum (int a,int b) return a+b;}
1 2 3 4 5 6 7 8 9 10 11 12 13 14 15 16 17 18 19 20 int main () Vector<int > vec1; Vector<char *> vec2; Vector<int *> vec3; Vector<int (*)(int ,int )>vec4; Vector<int (int ,int )>vec4; typedef int (*PFUNC1) (int , int ) PFUNC1 pfunc1 = sum; cout << pfunc1 (10 , 20 ) << endl; typedef int PFUNC2 (int , int ) PFUNC2 *pfunc2 = sum; cout << (*pfunc2)(10 , 20 ) << endl; return 0 ; }
先看有没有完全特例化,没有看部分特例化,最后看原模板
2.模板的实参推演 typeid().name用来得到传入参数的类型
向上面一样,我们如果得到的T是
1 int (*)(int ,int )或者int (int ,int )
那完全没什么作用,就只是知道了,而现在可以通过实参推演,获得各个部分是什么类型,以下面代码为例
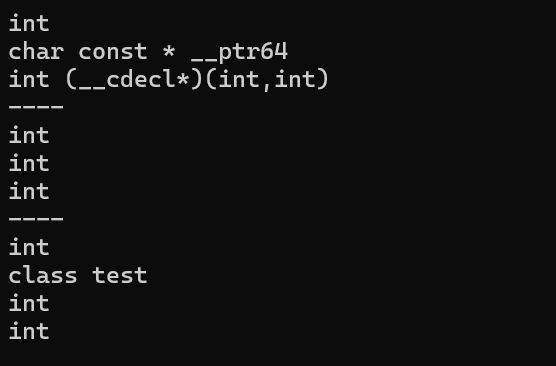
1 2 3 4 5 6 7 8 9 10 11 12 13 14 15 16 17 18 19 20 21 22 23 24 25 26 27 28 29 30 31 32 33 34 35 36 37 38 39 40 41 42 43 44 45 46 47 48 49 50 51 52 53 54 #include <iostream> #include <vector> #include <functional> #include <algorithm> #include <ctime> #include <typeinfo> using namespace std;template <typename T>void func (T a) cout << typeid (T).name () << endl; } int sum (int a, int b) return a + b; }template <typename R,typename A1,typename A2>void func2 (R (*a)(A1,A2)) cout << typeid (R).name () << endl; cout << typeid (A1).name () << endl; cout << typeid (A2).name () << endl; } class test { public : int sum (int a, int b) return a + b; } }; template <typename R, typename T,typename A1, typename A2>void func3 (R(T::*a)(A1, A2)) cout << typeid (R).name () << endl; cout << typeid (T).name () << endl; cout << typeid (A1).name () << endl; cout << typeid (A2).name () << endl; } int main () func (10 ); func ("aaa" ); func (sum); cout << "----" << endl; func2 (sum); cout << "----" << endl; func3 (&test::sum); return 0 ; }
运行结果:
从结果可以看出,我们可以获得各个类型
3.2 C++ STL中的绑定器 bind1st 和bind2nd 是C++标准库中的两个函数适配器,它们的主要作用是将一个二元函数对象 (即接受两个参数的函数对象)转换为一元函数对象(即接受一个参数的函数对象)。这两个函数适配器的区别主要在于它们绑定的是二元函数对象的哪一个参数。
只能用于二元
bind1st
功能 :bind1st函数接受一个二元函数和一个值,返回一个新的函数对象。这个新的函数对象将二元函数的第一个参数绑定为给定的值,因此调用时只需要提供第二个参数。使用场景 :当你希望将一个二元函数的第一个参数固定为某个值时,可以使用bind1st。这样,你就可以得到一个一元函数,其行为类似于原二元函数但第一个参数已被绑定。
bind2nd
功能 :与bind1st类似,bind2nd函数也接受一个二元函数和一个值,但返回的新函数对象将二元函数的第二个参数绑定为给定的值。因此,调用时只需要提供第一个参数。使用场景 :当你希望将一个二元函数的第二个参数固定为某个值时,可以使用bind2nd。这样,你也可以得到一个一元函数,但其行为是原二元函数且第二个参数已被绑定。
1 2 3 4 5 6 7 8 9 10 11 12 13 14 15 16 17 18 19 20 21 22 23 24 25 26 27 28 29 30 31 32 33 34 35 36 37 38 39 40 41 42 43 44 45 46 47 48 49 #include <iostream> #include <vector> #include <functional> #include <algorithm> #include <ctime> using namespace std;void printvec (vector<int >& v) for (auto c : v) cout << c << " " ; cout << endl; } int main () vector<int > vec; srand (time (nullptr )); for (int i = 0 ; i < 20 ; i++) { vec.push_back (rand () % 100 + 1 ); } printvec (vec); sort (vec.begin (), vec.end ()); printvec (vec); sort (vec.begin (), vec.end (),greater <int >()); printvec (vec); auto it1 = find_if (vec.begin (), vec.end (), bind1st (greater <int >(), 70 )); if (it1 != vec.end ()) vec.insert (it1, 70 ); printvec (vec); auto it2 = find_if (vec.begin (), vec.end (), bind2nd (less <int >(), 60 )); if (it2 != vec.end ()) vec.insert (it2, 60 ); printvec (vec); return 0 ; }
自己实现一个bind1st 1 2 3 4 5 6 7 8 9 10 11 12 13 14 15 16 17 18 19 20 21 22 23 24 25 26 27 28 29 30 31 32 33 34 35 36 37 38 39 40 41 42 43 44 45 46 47 48 49 50 51 52 53 54 55 56 57 58 59 60 61 62 63 64 65 66 67 #include <iostream> #include <vector> #include <functional> #include <algorithm> #include <ctime> using namespace std;template <typename Iterator,typename Compare>Iterator my_find_if (Iterator first, Iterator last, Compare comp) for (; first != last; first++) { if (comp (*first)) { return first; } } return last; } template <typename Compare, typename T>class _mybind1st { public : _mybind1st(Compare comp,T val):_comp(comp),_val(val){} bool operator () (const T& second) { return _comp(_val, second); } private : Compare _comp; T _val; }; template <typename Compare,typename T>_mybind1st<Compare,T> mybind1st (Compare comp, const T& val) return _mybind1st<Compare, T>(comp, val); } void printvec (vector<int >& v) for (auto c : v) cout << c << " " ; cout << endl; } int main () vector<int > vec; srand (time (nullptr )); for (int i = 0 ; i < 20 ; i++) vec.push_back (rand () % 100 + 1 ); printvec (vec); sort (vec.begin (), vec.end ()); printvec (vec); auto it1 = find_if (vec.begin (), vec.end (), mybind1st (greater <int >(), 70 )); if (it1 != vec.end ()) vec.insert (it1, 70 ); printvec (vec); return 0 ; }
过程说明:
创建 _mybind1st 对象 :mybind1st(greater<int>(), 70) 时,会创建一个 _mybind1st<greater<int>, int> 类型的临时对象。这个对象内部存储了 greater<int> 的一个实例(作为 _comp 成员变量)和整数 70(作为 _val 成员变量)。将 _mybind1st 对象传递给 my_find_if :_mybind1st 对象被传递给 my_find_if 函数作为 comp 参数。在 my_find_if 中调用 comp(*first) :my_find_if 的循环中,当调用 comp(*first) 时,实际上是在调用 _mybind1st 对象的 operator() 成员函数。这是因为 _mybind1st 对象是一个函数对象,它重载了 operator() 以使其表现得像一个函数。_mybind1st 的 operator() 实现_mybind1st 的 operator() 中,代码是 return _comp(_val, second);。这里,_comp 是存储的 greater<int> 对象,_val 是 70,而 second 是 *first(即当前正在检查的元素)。因此,这个调用实际上是在检查当前元素 *first 是否小于 70(因为 greater<int> 的 operator() 检查第一个参数是否大于第二个参数,而这里我们是在用 _val(即 70)作为第一个参数,*first 作为第二个参数)。
补充内容:
greater<int>是C++标准库中的一个模板类,用于表示两个整数之间的“大于”关系。当实例化greater<int>时,会得到一个函数对象,该函数对象重载了operator(),接受两个int类型的参数,并返回第一个参数是否大于第二个参数的布尔值。
例如:
1 2 greater<int > comp; bool result = comp (5 , 3 );
3.3 C++11从Boost库中引入了bind和function函数对象机制 1.function函数对象类型的应用示例(function基础) 绑定器,函数对象,lambda表达式 他们只能在一条语句中使用
function作用:把上面这三个的类型留下来,说得更清楚点就是再给他们一个名字然后方便之后通过调用给的名字来使用函数对象或者lambda的功能 。
function基础:
1.用函数类型实例化function
具体实例:
1 2 3 4 5 6 7 8 9 10 11 12 13 14 15 16 17 18 19 20 21 22 23 24 25 26 27 28 29 30 31 32 33 34 35 36 37 38 39 40 41 42 43 44 45 46 47 48 49 50 51 52 53 54 55 56 57 58 59 60 61 62 63 64 65 66 67 68 #include <iostream> #include <vector> #include <functional> #include <algorithm> #include <ctime> #include <typeinfo> using namespace std;void hello1 () cout << "hello world" << endl; } void hello2 (string str) cout << str << endl; } int sum (int a, int b) return a + b; } class test { public : void hello2 (string str) { cout << str << endl; } }; int main () function<void ()> func1 = hello1; func1 (); function<void (string)> func2 = hello2; func2 ("hello hello2" ); function<int (int , int )> func3 = sum; cout << func3 (20 , 30 ) << endl; function<int (int , int )> func4 = [](int a, int b)->int {return a + b; }; cout<<func4 (100 , 200 )<<endl; function<void (test*, string)> func5 = &test::hello2; func5 (&test (), "call test::hello" ); return 0 ; }
结合例子来看:
1.func1.operator() => hello1 先调用func1的()重载函数,然后调用包装的hello1
2.人原来有参数,你写的时候就要加上参数,传入的时候也要传入
3.lambda的类型保留 注意结尾不要忘了加分号
4.成员函数的类型保留
成员函数指针和普通函数指针不同
1 2 void (*print)(string str)void (test::*print)(striing str)
2.fucntion函数对象类型的实现原理 实例:
1 2 3 4 5 6 7 8 9 10 11 12 13 14 15 16 17 18 19 20 21 22 23 24 25 26 27 28 29 30 31 32 33 34 35 36 37 38 39 40 41 42 43 44 45 46 47 48 49 50 51 52 53 54 55 56 57 #include <iostream> #include <vector> #include <functional> #include <algorithm> #include <ctime> #include <typeinfo> using namespace std;void hello (string str) int sum (int a, int b) return a + b; }template <typename Fty>class myfunction {};template <typename R,typename A1>class myfunction <R (A1)>{ public : using PFUNC = R (*)(A1); myfunction (PFUNC pfunc):_pfunc(pfunc){} R operator () (A1 arg) { return _pfunc(arg); } private : PFUNC _pfunc; }; template <typename R, typename A1, typename A2>class myfunction <R (A1,A2)>{ public : using PFUNC = R (*)(A1,A2); myfunction (PFUNC pfunc) :_pfunc(pfunc) {} R operator () (A1 arg1,A2 arg2) { return _pfunc(arg1,arg2); } private : PFUNC _pfunc; }; int main () myfunction<void (string)> func1 = hello; func1 ("hello world" ); myfunction<int (int ,int )> func2 = sum; cout<<func2 (10 , 20 ) << endl; return 0 ; }
那肯定会觉得,那这得写多少代码才可以写完,但其实不需要。C+11中提供了可变参的类型参数:包(arg…)
可以理解为把你传进入的所有参数,依次一个一个的传入
感兴趣的读者可以去这里看看相关知识点,这里不再赘述。
C++11 新特性 学习笔记-CSDN博客
通过可变参数实现:
1 2 3 4 5 6 7 8 9 10 11 12 13 14 15 16 17 18 19 20 21 22 23 24 25 26 27 28 29 30 31 32 33 34 35 36 37 38 39 #include <iostream> #include <vector> #include <functional> #include <algorithm> #include <ctime> #include <typeinfo> using namespace std;void hello (string str) int sum (int a, int b) return a + b; }template <typename Fty>class myfunction {};template <typename R, typename ... A>class myfunction <R (A...)>{ public : using PFUNC = R (*)(A...); myfunction (PFUNC pfunc) :_pfunc(pfunc) {} R operator () (A... arg) { return _pfunc(arg...); } private : PFUNC _pfunc; }; int main () myfunction<void (string)> func1 = hello; func1 ("hello world" ); myfunction<int (int ,int )> func2 = sum; cout<<func2 (10 , 20 ) << endl; return 0 ; }
可以当做是一个可变参数模板的一个实例进行记忆。
3.bind bind绑定器返回的也是函数对象
1 2 3 4 5 6 7 8 9 10 11 12 13 14 15 16 17 18 19 20 21 22 23 24 25 26 27 28 29 30 31 32 33 34 35 36 37 38 39 40 #include <iostream> #include <vector> #include <functional> #include <algorithm> #include <ctime> #include <typeinfo> using namespace std;using namespace placeholders;void hello (string str) int sum (int a, int b) return a + b; }class test { public : int sum (int a, int b) return a + b; } }; int main () bind (hello, "hello bind" )(); cout << bind (sum, 10 , 20 )() << endl; cout<<bind (&test::sum, test (), 20 , 30 )()<<endl; bind (hello, placeholders::_1)("hello bind2" ); cout<<bind (sum, _1, _2)(100 , 200 )<<endl; function<void (string)> func1 = bind (hello,_1); func1 ("hello china" ); func1 ("hello a" ); func1 ("hello b" ); return 0 ; }
bind给成员函数绑定具体的对象(重点) 1 2 3 4 5 6 7 8 9 10 11 12 13 14 15 16 17 18 19 20 21 22 23 24 25 26 27 28 29 30 31 32 33 #include <iostream> #include <functional> #include <thread> class MyClass { public : void memberFunction (int value) std::cout << "Member function called with value: " << value << std::endl; } }; int main () MyClass obj; auto boundFunction = std::bind (&MyClass::memberFunction, &obj, 42 ); boundFunction (); auto boundFunctionGeneric = std::bind (&MyClass::memberFunction, &obj, std::placeholders::_1); boundFunctionGeneric (100 ); return 0 ; }
4.bind 和 function实现线程池 1 2 3 4 5 6 7 8 9 10 11 12 13 14 15 16 17 18 19 20 21 22 23 24 25 26 27 28 29 30 31 32 33 34 35 36 37 38 39 40 41 42 43 44 45 46 47 48 49 50 51 52 53 54 55 56 57 58 #include <iostream> #include <functional> #include <vector> #include <thread> using namespace std;class Thread { public : Thread (function<void ()> func) : _func(func) {} thread start () { thread t (_func) ; return t; } private : function<void ()> _func; }; class ThreadPool { public : ThreadPool () {} ~ThreadPool () { for (int i = 0 ; i < _pool.size (); i++) { delete _pool[i]; } } void startPool (int size) { for (int i = 0 ; i < size; i++) { _pool.push_back (new Thread (bind (&ThreadPool::runInThread, this , i))); } for (int i = 0 ; i < size; i++) { _handler.push_back (_pool[i]->start ()); } for (thread& t : _handler) { t.join (); } } private : vector<Thread*> _pool; vector<thread> _handler; void runInThread (int id) cout << "call runInThread id: " << id << endl; } }; int main () ThreadPool pool; pool.startPool (10 ); return 0 ; }
5.类的成员函数不能直接作为线程函数,需要bind进行绑定 在C++中,类的成员函数不能直接作为线程函数(即不能直接传递给std::thread的构造函数)。这是因为成员函数需要一个隐式的this指针来访问类的成员变量和成员函数,而普通的函数指针或可调用对象并不包含这个this指针的信息。
其实呢也好理解,就是一个成员函数你得有个实例对象才能用.或者->进行调用成员函数,光传一个名字谁知道你要调用哪个对象的这个函数,因为不同的对象内部成员变量什么的都不同,函数内部使用的也不同,所以得有一个this指向它。
当你尝试将成员函数直接作为线程函数时,编译器会报错,因为它无法确定this指针的值(在创建线程时,目标对象可能还没有被正确构造,或者this指针的值在多线程环境下可能变得不确定)。
为了在线程中调用类的成员函数,你有几个选项:
使用std::bind :std::bind可以绑定成员函数和this指针,生成一个新的可调用对象,这个对象可以被std::thread接受。这是你在问题中提到的方法。使用lambda表达式 :this指针(通常使用[&]或[=]捕获方式),然后在lambda体内调用成员函数。使用静态成员函数或友元函数 :使用类外部的普通函数 :
使用 std::bind 1 2 3 4 5 6 7 8 9 10 11 12 13 14 15 16 17 18 19 20 21 22 23 #include <iostream> #include <thread> class ConnectionPool { public : void produceConnectionTask () std::cout << "Producing connection task in thread " << std::this_thread::get_id () << std::endl; } void startProducing () std::thread producerThread (std::bind(&ConnectionPool::produceConnectionTask, this )) ; producerThread.join (); } }; int main () ConnectionPool pool; pool.startProducing (); return 0 ; }
使用 Lambda 表达式 1 2 3 4 5 6 7 8 9 10 11 12 13 14 15 16 17 18 19 20 21 22 23 24 25 #include <iostream> #include <thread> class ConnectionPool { public : void produceConnectionTask () std::cout << "Producing connection task in thread " << std::this_thread::get_id () << std::endl; } void startProducing () std::thread producerThread ([this ]() { this ->produceConnectionTask(); }) producerThread.join (); } }; int main () ConnectionPool pool; pool.startProducing (); return 0 ; }
使用静态成员函数或友元函数 注意,静态成员函数不能访问非静态成员变量,因此这个方法通常用于不需要访问类实例状态的函数。这里我改为使用友元函数来演示,因为它可以访问类的私有和保护成员。
1 2 3 4 5 6 7 8 9 10 11 12 13 14 15 16 17 18 19 20 21 22 23 24 25 26 27 28 29 30 #include <iostream> #include <thread> class ConnectionPool { friend void produceConnectionTaskWrapper (ConnectionPool& pool) void produceConnectionTask () std::cout << "Producing connection task in thread " << std::this_thread::get_id () << std::endl; } public : void startProducing () std::thread producerThread (produceConnectionTaskWrapper, std::ref(*this )) ; producerThread.join (); } }; void produceConnectionTaskWrapper (ConnectionPool& pool) pool.produceConnectionTask (); } int main () ConnectionPool pool; pool.startProducing (); return 0 ; }
使用类外部的普通函数 1 2 3 4 5 6 7 8 9 10 11 12 13 14 15 16 17 18 19 20 21 22 23 24 25 26 27 28 #include <iostream> #include <thread> class ConnectionPool { public : void produceConnectionTask () std::cout << "Producing connection task in thread " << std::this_thread::get_id () << std::endl; } void startProducing (ConnectionPool* pool) std::thread producerThread (produceConnectionTaskExternal, pool) ; producerThread.join (); } }; void produceConnectionTaskExternal (ConnectionPool* pool) pool->produceConnectionTask (); } int main () ConnectionPool pool; pool.startProducing (&pool); return 0 ; }
3.4 lambda表达式 底层依赖函数对象机制实现的 1.lambda概述 函数对象的的升级版—-lambda
函数对象的缺点:
灵活性太差了,需要定一个类出来,但其实实际上我可能只需要在泛型算法里面用一次就不用了
2.lambda表达式的语法 语法:
1 [捕获外部变量](形参列表)->返回值{操作代码};
注意操作代码后面也有分号,句子结束也有分号,不要忘了,不要少写
如果没有返回值”->返回值”这部分可以省略
关于形参列表部分,如果参数,关键字,返回值一个都没有,那小括号可写可不写,如果有一个那就得写小括号
形参列表对应的是函数对象中operator()()的形参列表
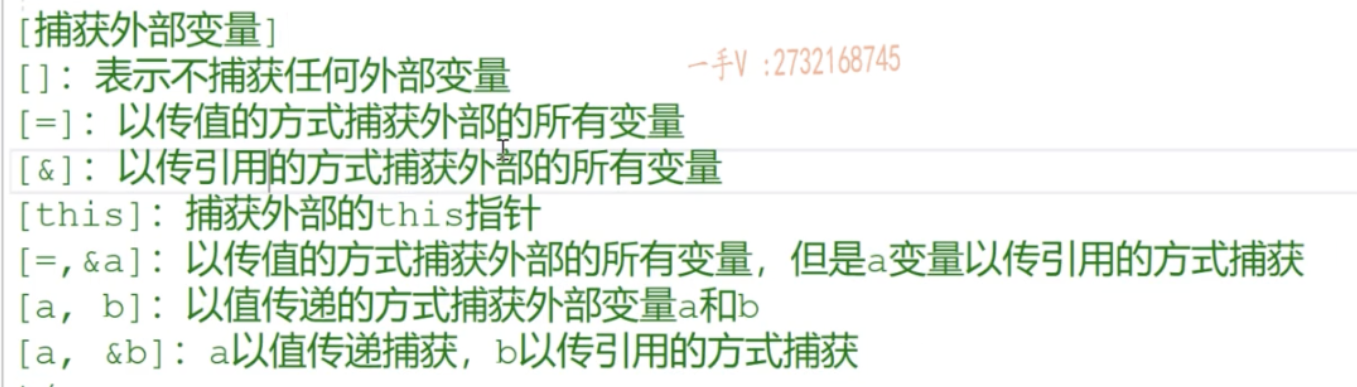
lambda匿名函数中的[外部变量] 外部变量指的是和lambda在一个作用域的变量,写[=]把同一作用域和更外层的变量拷贝一个副本
这个应该对应函数对象的类里面的成员变量
外部变量格式
功能
[]
空方括号表示当前 lambda 匿名函数中不导入任何外部变量。
[=]
只有一个 = 等号,表示以值传递的方式导入所有外部变量;
[&]
只有一个 & 符号,表示以引用传递的方式导入所有外部变量;
[val1,val2,…]
表示以值传递的方式导入 val1、val2 等指定的外部变量,同时多个变量之间没有先后次序;
[&val1,&val2,…]
表示以引用传递的方式导入 val1、val2等指定的外部变量,多个变量之间没有前后次序;
[val,&val2,…]
以上 2 种方式还可以混合使用,变量之间没有前后次序。
[=,&val1,…]
表示除 val1 以引用传递的方式导入外,其它外部变量都以值传递的方式导入。
[this]
表示以值传递的方式导入当前的 this 指针。
注意,单个外部变量不允许以相同的传递方式导入多次。例如 [=,val1] 中,val1 先后被以值传递的方式导入了 2 次,这是非法的。
代码示例:
1 2 3 4 5 6 7 8 9 10 11 12 13 14 15 16 17 18 19 20 21 22 23 24 25 26 27 28 29 30 31 32 33 34 35 36 37 38 39 40 41 42 43 44 45 46 47 48 49 50 51 52 53 54 55 56 57 58 59 60 61 62 63 64 65 66 67 68 69 70 71 72 73 74 75 76 77 78 79 80 81 82 83 84 85 86 87 88 89 90 91 92 93 94 95 96 97 98 99 100 101 102 103 104 105 106 107 108 109 110 111 112 113 114 115 116 117 118 119 120 121 122 123 124 125 126 127 128 129 130 131 132 133 134 135 136 137 138 139 140 141 142 143 144 #include <iostream> #include <vector> #include <functional> #include <algorithm> #include <ctime> #include <typeinfo> using namespace std;using namespace placeholders;template <typename T=void >class testLambda01{ public : testLambda01 (){} void operator ()() { cout << "hello world" << endl; } }; template <typename T = int >class testLambda02{ public : testLambda02 () {} int operator ()(int a,int b) { return a + b; } }; template <typename T = int >class testLambda03{ public : testLambda03 (int a,int b):ma (a),mb (b) {} void operator ()() const { int tmp = ma; ma = mb; mb = tmp; } private : mutable int ma; mutable int mb; }; int main () int a = 10 ; int b = 20 ; auto func3 = [a, b]()mutable { int tmp = a; a = b; b = tmp; }; func3 (); cout << "a " << a << "b " << b << endl; testLambda03<> t3 (a, b); t3 (); cout << "a " << a << "b " << b << endl; return 0 ; } template <typename T = int >class testLambda04{ public : testLambda04 (int &a, int &b):ma (a),mb (b) {} void operator ()() const { int tmp = ma; ma = mb; mb = tmp; } private : int &ma; int &mb; }; int main () auto func1 = []()->void {cout << "hello world" <<endl; }; func1 (); auto func2 = [](int a, int b)->int {return a + b; }; cout << func2 (20 , 30 ) << endl; testLambda01<> t1; t1 (); testLambda02<> t2; cout<<t2 (20 ,30 )<<endl; int a = 10 ; int b = 20 ; auto func3 = [a, b]()mutable { int tmp = a; a = b; b = tmp; }; func3 (); cout <<"a " << a <<"b " << b << endl; testLambda03<> t3 (a,b); t3 (); cout << "a " << a << "b " << b << endl; return 0 ; }
Q:为什么在类中换成引用类型就不需要mtable来修饰成员变量了?
在C++中,当成员变量是引用类型时,即使在const成员函数内部,我们也可以通过这些引用来修改它们所引用的外部对象的状态。这是因为const成员函数中的const关键字限制了成员变量本身的“可修改性”(如果成员变量不是引用或指针的话),但它并不限制通过成员变量(如果它们是引用或指针)所间接访问的对象的可修改性。
具体来说,当一个成员函数被声明为const时,这意味着该成员函数不能修改其所属对象的任何非静态成员变量(除非这些变量被声明为mutable)。然而,这一规则并不适用于引用类型的成员变量,因为引用本身并不是对象,它只是对象的一个别名。当我们说“不能修改成员变量”时,实际上是指不能改变成员变量所引用的对象(如果成员变量是对象的话)或成员变量所指向的地址(如果成员变量是指针的话)。但是,如果成员变量是引用,并且它引用了一个外部对象,那么我们完全可以通过这个引用来修改那个外部对象的状态。
换句话说,const成员函数中的const性仅仅保证了成员函数不会改变其所属对象的“身份”(即不会改变成员变量的值,如果成员变量是值类型的话),但并不保证不会改变成员变量所引用的外部对象的“状态”。
3.lambda的应用实践 1.泛型算法之中 就使用这一下,不用麻烦的写函数对象
1 2 3 4 5 6 7 8 9 10 vector<int > v; sort (v.begin (),v.end (),[](int a,int b)->bool { return a>b; }) auto it=find_id (v.begin (),v.end (),[](int a)->bool {return a<65 ;});if (it!=v.end ()) v.insert (it,65 );
为什么a,b在()而不是[]里面?
在C++中,当你使用lambda表达式作为sort函数的比较函数时,lambda表达式的参数(在这个例子中是a和b)是通过operator()函数传入的,而不是通过捕获列表[]传入的。这是因为捕获列表[]用于指定哪些外部变量应该被捕获到lambda表达式的内部作用域中,而不是用于接收函数参数。
2.既然lambda只能用在语句中,如果想跨语句使用之前定义好的lambda表达式怎么办?有什么类型表达lambda? 解决方法:用函数对象function表示lambda的类型,lambda->函数对象
1 2 3 4 5 6 7 8 9 10 11 12 13 14 15 16 17 18 19 20 21 22 23 24 25 26 27 28 29 30 31 32 33 34 35 36 37 38 39 40 41 42 43 44 45 46 47 48 class Data { public : Data (int val1=10 ,int val2=10 ):ma (val1),mb (val2){} bool operator >(const Data &data) const { return ma > data.ma; } bool operator <(const Data &data) const { return ma < data.ma; } int ma; int mb; } int main () map<int , function<int (int , int )>> caculateMap; caculateMap [1 ] = [] (int a, int b)->int {return a + b; }; caculateMap [2 ] = [] (int a, inth)>int {return a - b; }; caculateMap [3 ] = [] (int a, int b)->int {return a * b; }; caculateMap [4 ] = [] (int a, int b)->int {return a / b; }; cout << "选择:" ; int choice; cin >> choice; cout << "10 + 15:" << caculateMap[choice] (10 , 15 ) << endl; int main () unique_ptr<FILE,function<void (FILE *) >> pti1 (fopen ("data.txt" , "w" ), [] (FILE *pf) {fclose(pf); }) ; priority_queue<Data> queue; queue.push (Data (10 ,20 )); queue.push (Data (15 ,15 )); queue.push (Data (20 ,30 )); using PFUNC=function<bool (Data&,Data&)>; priority_queue<Data,vector<Data>,PFUNC> q ([](Data &d1,Data &d2)->bool { return d1. ma>d2. ma; } ); q.push (Data (10 ,20 )); q.push (Data (15 ,15 )); q.push (Data (20 ,30 )); return 0 ; }
四、c++11内容汇总、多线程应用实践 4.1 c++11内容汇总 1 2 3 4 5 6 7 8 9 10 11 12 13 14 15 16 17 18 19 20 21 22 23 24 25 26 27 28 29 一:关键字和语法 auto :可以根据右值,推导出右值的类型,然后左边变量的类型也就已知了nullptr :给指针专用(能够和整数进行区别)foreach:可以遍历数组,容器等 for (Type val:container)=>底层就是通过指针或者迭代器来实现的{ } 右值引用:move移动语义函数和forward类型完美转发函数 模板的一个新特性:typename ... A 表示可变参(类型参数) 二:绑定器和函数对象 function:函数对象 bind:绑定器 lambda表达式 三:智能指针 shared ptr和weak_ptr 四:容器 set和map:红黑树 O (1 gn) unordered set和unordered map:哈希表 O (1 ) array: 数组 forward list:前向链表 五:C++语言级别支持的多线程编程 createThread pthread create clone
读者可参考此文章进行学习
C++11 新特性 学习笔记-CSDN博客
4.2 C++语言级别的多线程编程 可以看这些复习。
C++多线程详解 | 线程创建 | 互斥锁 | 条件变量 | 线程池_c++ 线程-CSDN博客
C++11 多线程(std::thread)详解_c++11线程使用-CSDN博客
语言级别多线程最大的优点:可跨平台
就是在语言层面加了一层封装,c++里面加了一些宏可以识别当前的操作系统,然后还是去调用相应的系统调用
比如linux就还是底层调用pthread_creat之类的函数
多线程编程两个问题:
1.线程间的互斥
竞态条件–>临界区代码段–>原子操作–>互斥锁或者CAS
竞态条件:
竞态条件指的是设备或系统出现不恰当的执行时序,导致得到不正确的结果。从多进程间通信的角度来看,竞态条件发生在两个或多个进程对共享的数据进行读或写的操作时,最终的结果取决于这些进程的执行顺序。在并发编程中,竞态条件通常指的是程序的执行结果依赖于线程执行的顺序。
临界区代码段:
导致竞态条件发生的代码段被称为临界区代码段。在临界区内,代码的执行顺序对结果有重要影响,因此必须确保同一时间只有一个线程能够执行临界区内的代码。
保证临界区代码段的原子操作通过互斥锁或者CAS实现
2.线程间的同步通信
生产者,消费者线程模型
注:C++的STL容器在默认状态下都是线程不安全的
1.通过thread类编写C++多线程程序 1.头文件以及命名空间 1 2 头文件:#include<thread> 写using namespace std; 或者 std::thread 都可以使用thread类
2.线程创建 std :: thread定义一个线程对象,传入线程所需要的线程函数和参数,线程自动开启
定义一个线程对象 参数传入一个线程函数threadHandle1
一个线程对应一个线程栈 这个名字就是线程的入口函数
传入后,新线程就开始运行了,其实就是入口函数开始运行了
第一个参数是线程函数,第二个参数开始就是线程函数的参数了
1 2 3 4 5 6 7 8 void threadHandle1 (int time) this_thread::sleep_for (std::chrono::seconds (time)); cout << "hello thread" << endl; } thread t1 (threadHandle1,2 ) ;
注意:类的成员函数不能直接作为线程函数,需要bind进行绑定 在C++中,类的成员函数不能直接作为线程函数(即不能直接传递给std::thread的构造函数)。这是因为成员函数需要一个隐式的this指针来访问类的成员变量和成员函数,而普通的函数指针或可调用对象并不包含这个this指针的信息。
其实呢也好理解,就是一个成员函数你得有个实例对象才能用.或者->进行调用成员函数,光传一个名字谁知道你要调用哪个对象的这个函数,因为不同的对象内部成员变量什么的都不同,函数内部使用的也不同,所以得有一个this指向它。
当你尝试将成员函数直接作为线程函数时,编译器会报错,因为它无法确定this指针的值(在创建线程时,目标对象可能还没有被正确构造,或者this指针的值在多线程环境下可能变得不确定)。
为了在线程中调用类的成员函数,你有几个选项:
使用std::bind :std::bind可以绑定成员函数和this指针,生成一个新的可调用对象,这个对象可以被std::thread接受。这是你在问题中提到的方法。使用lambda表达式 :this指针(通常使用[&]或[=]捕获方式),然后在lambda体内调用成员函数。使用静态成员函数或友元函数 :使用类外部的普通函数 :
使用 std::bind 1 2 3 4 5 6 7 8 9 10 11 12 13 14 15 16 17 18 19 20 21 22 23 #include <iostream> #include <thread> class ConnectionPool { public : void produceConnectionTask () std::cout << "Producing connection task in thread " << std::this_thread::get_id () << std::endl; } void startProducing () std::thread producerThread (std::bind(&ConnectionPool::produceConnectionTask, this )) ; producerThread.join (); } }; int main () ConnectionPool pool; pool.startProducing (); return 0 ; }
使用 Lambda 表达式 1 2 3 4 5 6 7 8 9 10 11 12 13 14 15 16 17 18 19 20 21 22 23 24 25 #include <iostream> #include <thread> class ConnectionPool { public : void produceConnectionTask () std::cout << "Producing connection task in thread " << std::this_thread::get_id () << std::endl; } void startProducing () std::thread producerThread ([this ]() { this ->produceConnectionTask(); }) producerThread.join (); } }; int main () ConnectionPool pool; pool.startProducing (); return 0 ; }
使用静态成员函数或友元函数 注意,静态成员函数不能访问非静态成员变量,因此这个方法通常用于不需要访问类实例状态的函数。这里我改为使用友元函数来演示,因为它可以访问类的私有和保护成员。
1 2 3 4 5 6 7 8 9 10 11 12 13 14 15 16 17 18 19 20 21 22 23 24 25 26 27 28 29 30 #include <iostream> #include <thread> class ConnectionPool { friend void produceConnectionTaskWrapper (ConnectionPool& pool) void produceConnectionTask () std::cout << "Producing connection task in thread " << std::this_thread::get_id () << std::endl; } public : void startProducing () std::thread producerThread (produceConnectionTaskWrapper, std::ref(*this )) ; producerThread.join (); } }; void produceConnectionTaskWrapper (ConnectionPool& pool) pool.produceConnectionTask (); } int main () ConnectionPool pool; pool.startProducing (); return 0 ; }
使用类外部的普通函数 1 2 3 4 5 6 7 8 9 10 11 12 13 14 15 16 17 18 19 20 21 22 23 24 25 26 27 28 #include <iostream> #include <thread> class ConnectionPool { public : void produceConnectionTask () std::cout << "Producing connection task in thread " << std::this_thread::get_id () << std::endl; } void startProducing (ConnectionPool* pool) std::thread producerThread (produceConnectionTaskExternal, pool) ; producerThread.join (); } }; void produceConnectionTaskExternal (ConnectionPool* pool) pool->produceConnectionTask (); } int main () ConnectionPool pool; pool.startProducing (&pool); return 0 ; }
3.子线程如何结束 子线程函数运行完成,线程就结束了
4.主线程如何处理子线程 主线程和子线程没有先后顺序,自己运行自己的
子线程可以比主线程早结束,但通常不推荐这么做,最好就是确保子线程都结束了主线程再结束
1.join函数
主线程阻塞等待子线程t1结束,主线程继续往下进行
2.detach函数
使用detach()会将子线程t1与主线程main分离,主线程结束,整个进程结束,所有子线程都自动结束了
不是很安全,不推荐使用
实例代码:
1 2 3 4 5 6 7 8 9 10 11 12 13 14 15 16 17 18 19 20 21 22 23 24 25 26 #include <iostream> #include <vector> #include <functional> #include <algorithm> #include <ctime> #include <typeinfo> #include <thread> using namespace std;void threadHandle1 (int time) this_thread::sleep_for (std::chrono::seconds (time)); cout << "hello thread" << endl; } int main () thread t1 (threadHandle1,2 ) ; t1. detach (); cout << "main thread" << endl; return 0 ; }
2.线程互斥 1.为什么需要线程互斥 竞态条件:多线程程序执行的结果是一直的,不会随着CPU对线程不同的调用顺序而产生不同的运行结果
1 2 3 4 5 6 7 8 9 10 11 12 13 14 15 16 17 18 19 20 21 22 23 24 25 26 27 28 29 30 31 32 33 #include <iostream> #include <thread> #include <list> #include <mutex> using namespace std;int countSum = 100 ;void sellTicket (int index) while (countSum > 0 ) { cout << "窗口:" << index << "卖出第:" << countSum << "张票" << endl; countSum--; this_thread::sleep_for (std::chrono::milliseconds (100 )); } } int main () list<thread> tlist; for (int i = 1 ; i <= 3 ; i++) tlist.push_back (thread (sellTicket, i)); for (thread & c : tlist) c.join (); cout << "所有窗口卖票结束" << endl; return 0 ; }
在本个例子中存在竞态条件,因为每次执行结果都不一样的
原因是,对车票–操作不是一个线程安全的操作,每个线程减到一半可能时间片到了就去执行另外一个线程,导致一张票卖出去多次(出现了相同的数字的票)
2.mutex 互斥锁 在linux中mutex底层也调用的是系统调用,用的是pthread_mutex_t互斥锁
锁的概念参考这篇文章,这里不再赘述
黑马程序员 | linux系统编程 | 学习笔记_linux网络操作系统项目教程黑马程序员电子版-CSDN博客
头文件:
互斥锁创建及使用
1 2 3 4 5 6 7 8 std::mutex mtx; void 对应线程函数(形参列表){ mtx.lock (); 核心代码,需要原子操作的(即必须要一次执行完的,不能执行到一半去别的线程) mtx.unlock (); }
1 2 3 4 5 6 7 8 9 10 11 12 13 14 mutex mtx; void sellTicket (int index) mtx.lock (); while (countSum > 0 ) { cout << "窗口:" << index << "卖出第:" << countSum << "张票" << endl; countSum--; this_thread::sleep_for (std::chrono::milliseconds (100 )); } mtx.unlock (); }
这样改是不行的,我们把整个函数代码都上锁,那么只会有一个窗口卖票剩下的都不会卖的,因为它占有的mutex资源一直没有释放
所以只保证核心的代码的原子性就行,锁的内容尽量的少
1 2 3 4 5 6 7 8 9 10 11 12 void sellTicket (int index) while (countSum > 0 ) { mtx.lock (); cout << "窗口:" << index << "卖出第:" << countSum << "张票" << endl; countSum--; mtx.unlock (); this_thread::sleep_for (std::chrono::milliseconds (100 )); } }
这样还是不完全安全,如果线程1在卖最后一张票,拿上锁,但还没有–的时候线程2进来了,他一看还有一张票,就等着锁资源,1卖完了最后一张,释放锁,2进来了卖的就是第0张票
所以要采用 锁+双重判断 的模式
1 2 3 4 5 6 7 8 9 10 11 12 13 14 15 void sellTicket (int index) while (countSum > 0 ) { mtx.lock (); if (countSum > 0 ) { cout << "窗口:" << index << "卖出第:" << countSum << "张票" << endl; countSum--; } mtx.unlock (); this_thread::sleep_for (std::chrono::milliseconds (100 )); } }
如果说,mutex中间满足条件子线程函数结束了,那么后面的线程会一直拿不到锁
在C++中,互斥锁(std::mutex)不会自动因为线程的结束而被释放;锁的释放必须显式地通过调用unlock成员函数来完成,或者使用RAII(Resource Acquisition Is Initialization)机制来自动管理。
如果子线程在没有显式释放锁的情况下结束,那么锁将保持锁定状态,这通常会导致几个问题:
死锁 :其他尝试获取该锁的线程将被永久阻塞,因为它们无法获取到已经被持有且未释放的锁。资源泄露 :锁是一种有限资源,如果它们被永久占用而不释放,那么系统将无法有效地管理这些资源,可能导致性能下降或资源耗尽。数据不一致 :如果锁保护的共享数据在锁未释放的情况下被其他线程访问或修改,那么可能会导致数据不一致或损坏。
所以要用lock_guard(RALL)来对锁进行管理,类似于裸指针和智能指针那样的
1 2 3 4 mutex mtx; lock_guard<mutex> lock (mtx) ;需要上锁的核心代码 lock生命周期结束调用析构,自动释放锁资源
1 2 3 4 5 6 7 8 9 10 11 12 13 14 15 void sellTicket (int index) while (countSum > 0 ) { lock_guard<mutex> lock (mtx) ; if (countSum > 0 ) { cout << "窗口:" << index << "卖出第:" << countSum << "张票" << endl; countSum--; } this_thread::sleep_for (std::chrono::milliseconds (100 )); } }
可以通过加大括号 来限制lock_guard的作用域,除了大括号就析构释放资源了
1 2 3 4 5 6 7 8 9 10 11 12 13 14 15 16 17 void sellTicket (int index) while (countSum > 0 ) { { lock_guard<mutex> lock (mtx) ; if (countSum > 0 ) { cout << "窗口:" << index << "卖出第:" << countSum << "张票" << endl; countSum--; } } this_thread::sleep_for (std::chrono::milliseconds (100 )); } }
但函数参数传递或者返回的时候就不能用lock_guard了,因为它不支持赋值和重载
可以用unique_lock(升级版),和unique_ptr一样,拷贝和赋值重载被delete,但是给了右值引用赋值,调用析构也会释放锁资源
使用方法:
构造和析构时,占有锁和释放锁
也可以显示调用
l.lock()和l.unlock()但是没什么必要
1 2 3 4 5 6 7 8 9 10 11 12 13 14 15 void sellTicket (int index) while (countSum > 0 ) { { unique_lock<mutex> l (mtx) ; if (countSum > 0 ) { cout << "窗口:" << index << "卖出第:" << countSum << "张票" << endl; countSum--; } } this_thread::sleep_for (std::chrono::milliseconds (100 )); } }
3.基于CAS操作的atomic原子类型 如果只有一两个语句需要原子特性,那没必要加锁,太麻烦了
系统理论:CAS来保证上面的++ –操作的原子特性就足够了,也被称为无锁操作
这个无锁指的,不是从软件层面加锁,而是硬件层面。
硬件实现具体过程:CPU从内存取出数据,计算,再写回内存的过程 中对总线加锁,这个时候不允许线程去使用总线,通过这种方式来完成的”加锁”
面经当中的无锁操作比如无锁队列都指的是通过CAS来实现的
头文件
volatile关键字
1 2 3 4 5 volatile atomic_bool isReady = false ;volatile std::atomic_int num = 0 ;
实例代码:
1 2 3 4 5 6 7 8 9 10 11 12 13 14 15 16 17 18 19 20 21 22 23 24 25 26 27 28 29 30 31 32 33 34 35 36 37 38 39 #include <iostream> #include <thread> #include <list> #include <mutex> #include <atomic> using namespace std;volatile atomic_bool isReady = false ;volatile std::atomic_int num = 0 ;void task (int index) while (!isReady) { this_thread::yield (); } for (int i = 0 ; i < 100 ; i++) num++; } int main () list<thread> tlist; for (int i = 1 ; i <= 10 ; i++) tlist.push_back (thread (task, i)); this_thread::sleep_for (std::chrono::seconds (2 )); isReady = true ; cout << num << endl; for (thread & c : tlist) c.join (); cout << num << endl; return 0 ; }
3.线程同步通信 读者可参考这篇文章的线程同步通信一起学习,是在linux环境下的线程同步通信
黑马程序员 | linux系统编程 | 学习笔记_linux网络操作系统项目教程黑马程序员电子版-CSDN博客
以及下面这篇
【C++】多线程编程图文详解(多角度详解,小白一看就懂!!)-CSDN博客
条件变量 头文件
1 #include<condition_variable>
std::condition_variable 是C++标准库中的一个类,用于在多线程编程中实现线程间的条件变量和线程同步。它提供了 等待通知 的机制,使得线程可以等待某个条件成立时被唤醒,或者在满足某个条件时通知其他等待的线程。其提供了以下几个函数用于等待和通知线程:
方法 说明
wait 使当前线程进入等待状态,直到被其他线程通过**notify_one()或 notify_all()**函数唤醒。该函数需要一个互斥锁作为参数,调用时会自动释放互斥锁,并在被唤醒后重新获取互斥锁。
wait_for 使当前线程进入等待状态,最多等待一定的时间,直到被其他线程通过notify_one()或 notify_all()函数唤醒,或者等待超时。该函数需要一个互斥锁和一个时间段作为参数,返回时有两种情况:等待超时返回 std::cv_status::timeout ,被唤醒返回std::cv_status::no_timeout 。
wait_until 使当前线程进入等待状态,直到被其他线程通过notify_one()或notify_all()函数唤醒,或者等待时间达到指定的绝对时间点。该函数需要一个互斥锁和一个绝对时间点作为参数,返回时有两种情况:时间到达返回 std::cv_status::timeout ,被唤醒返回std::cv_status::no_timeout
notify_one 唤醒一个等待中的线程,如果有多个线程在等待,则选择其中一个线程唤醒
notify_all 唤醒所有等待中的线程,使它们从等待状态返回
std::condition_variable的主要特点如下:
等待和通知机制:std::condition_variable 允许线程进入等待状态,直到某个条件满足时才被唤醒。线程可以调用wait函数进入等待状态,并指定一个互斥量作为参数,以确保线程在等待期间互斥量被锁定。当其他线程满足条件并调用 notify_one 或 notify_all 函数时,等待的线程将被唤醒并继续执行。
与互斥量配合使用:std::condition_variable 需要与互斥量(std::mutex或std::unique_lockstd::mutex)配合使用,以确保线程之间的互斥性。在等待之前,线程必须先锁定互斥量,以避免竞争条件。当条件满足时,通知其他等待的线程之前,必须再次锁定互斥量。
支持超时等待:std::condition_variable 提供了带有超时参数的等待函数 wait_for 和wait_until ,允许线程在等待一段时间后自动被唤醒。这对于处理超时情况或限时等待非常有用。
使用std::condition_variable的一般步骤如下:
创建一个std::condition_variable对象。
创建一个互斥量对象(std::mutex或std::unique_lockstd::mutex )。
在等待线程中,使用std::unique_lock锁定互斥量,并调用wait函数进入等待状态。
在唤醒线程中,使用std::unique_lock锁定互斥量,并调用notify_one或notify_all函数通知等待的线程。
等待线程被唤醒后,继续执行相应的操作。
示例:
模拟一个简单的计数器。一个线程负责增加计数,另一个线程等待并打印计数的值。
1 2 3 4 5 6 7 8 9 10 11 12 13 14 15 16 17 18 19 20 21 22 23 24 25 26 27 28 29 30 31 32 33 34 35 #include <iostream> #include <thread> #include <mutex> #include <condition_variable> // 定义共享变量和相关的同步工具 int count = 0; // 计数器 std::mutex mtx; // 互斥锁 std::condition_variable cv; // 条件变量 // 增加计数的线程函数 void increment() { for (int i = 0; i < 5; ++i) { std::this_thread::sleep_for(std::chrono::milliseconds(100)); // 模拟工作 std::unique_lock<std::mutex> lock(mtx); // 使用 unique_lock count++; // 增加计数 std::cout << "计数增加到: " << count << std::endl; cv.notify_one(); // 通知其他线程 } } // 打印计数的线程函数 void print() { for (int i = 0; i < 5; ++i) { std::unique_lock<std::mutex> lock(mtx); // 加锁 cv.wait(lock); // 等待通知 std::cout << "当前计数是: " << count << std::endl; // 打印计数 } } int main() { std::thread t1(increment); // 创建增加计数的线程 std::thread t2(print); // 创建打印计数的线程 t1.join(); // 等待线程完成 t2.join(); return 0; }
共享变量 :
int count = 0;std::mutex mtx;countstd::condition_variable cv;:定义一个条件变量,用于线程同步。
增加计数的线程 (increment 函数):
使用 std::this_thread::sleep_for
使用 std::lock_guardcount 时没有其他线程干扰。
增加计数并打印当前值,然后使用 cv.notify_one() 通知等待的线程。
打印计数的线程 (print 函数):
使用 cv.wait(lock)increment
打印当前的计数值。
线程间通信 通过信号量实现线程间的通信(即互相通知)
生产者消费者模型
1 2 3 4 5 6 7 8 9 10 11 12 13 14 15 16 17 18 19 20 21 22 23 24 25 26 27 28 29 30 31 32 33 34 35 36 37 38 39 40 41 42 43 44 45 46 47 48 49 50 51 52 53 54 55 56 57 58 59 60 61 62 63 64 65 66 67 68 69 70 71 72 73 74 75 76 77 78 79 80 81 82 83 84 85 86 87 88 89 90 #include <iostream> #include <thread> #include <list> #include <mutex> #include <atomic> #include <queue> #include <condition_variable> using namespace std;mutex mtx; condition_variable cv; class Queue { public : void put (int val) { unique_lock<mutex> lck (mtx) ; while (!que.empty ()) { cv.wait (lck); } que.push (val); cv.notify_all (); cout << "生产者 生产:" << val << "号物品" << endl; } int get () { unique_lock<mutex> lck (mtx) ; while (que.empty ()) { cv.wait (lck); } int val = que.front (); que.pop (); cv.notify_all (); cout << "消费者 消费" << val << "号物品" << endl; return val; } private : queue<int > que; }; void producer (Queue* que) for (int i = 1 ; i <= 10 ; i++) { que->put (i); this_thread::sleep_for (std::chrono::milliseconds (100 )); } } void consumer (Queue* que) for (int i = 1 ; i <= 10 ; i++) { int val = que->get (); this_thread::sleep_for (std::chrono::milliseconds (100 )); } } int main () Queue que; thread t1 (producer, &que) ; thread t2 (consumer, &que) ; t1. join (); t2. join (); return 0 ; }
五、设计模式
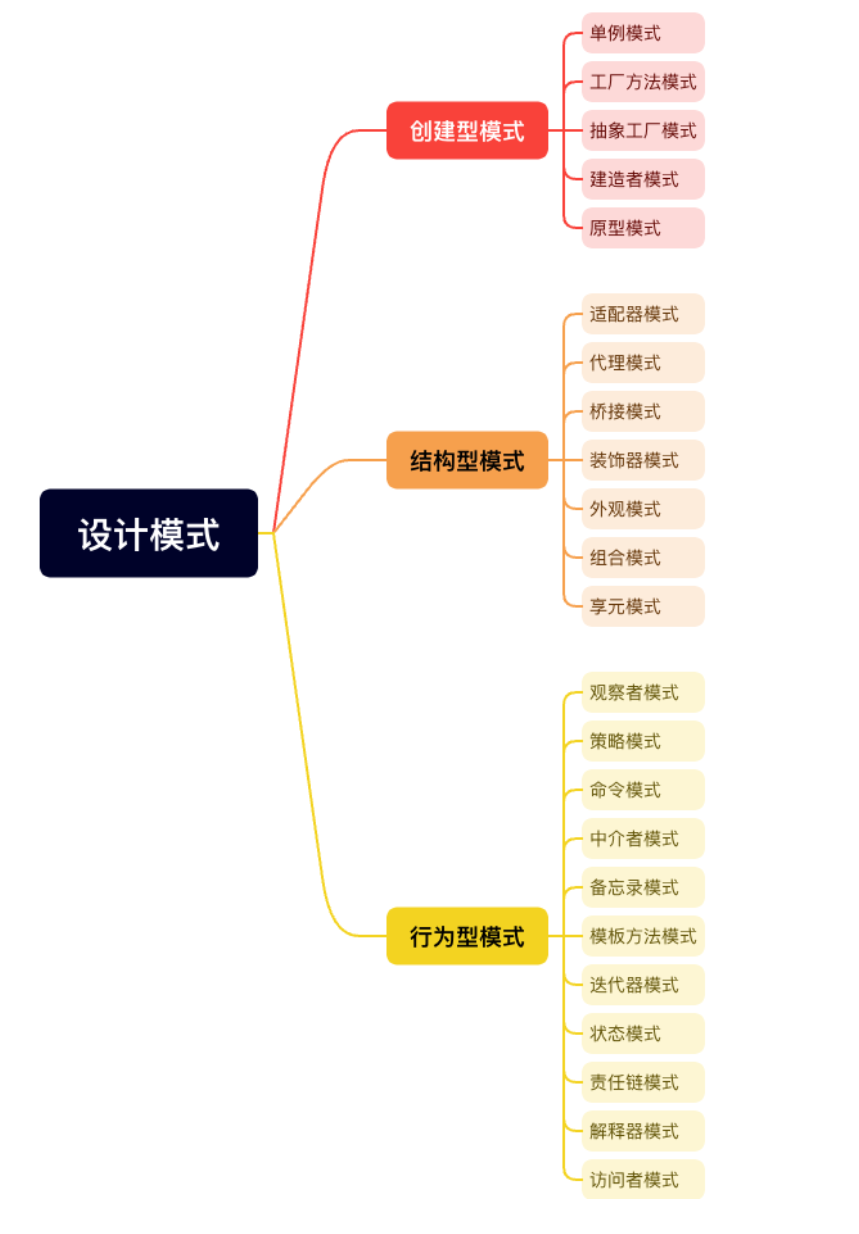
这里贴出常用的23中设计模式。视频课程仅包含部分,剩余部分需要找其他课程或者资料进行自学。
1.设计模式三大类型概述 C++设计模式是一套被广泛认可的用于解决常见软件设计问题的最佳实践,它们可以帮助开发者编写更加清晰、可维护和可扩展的代码。根据解决的问题类型,设计模式通常被分为三大类:创建型、结构型和行为型。以下是对每一大类的概述及其特点:
一、创建型设计模式 创建型设计模式主要关注于对象的创建机制,帮助使系统独立于如何创建、组合和表示对象。
特点 :
将对象的创建和使用分离,增加代码的灵活性和可维护性。
通过定义创建对象的接口或方法,使得子类或具体实现类可以决定实例化哪个类。
常见模式 :
单例模式(Singleton) :确保一个类只有一个实例,并提供一个全局访问点。工厂方法模式(Factory Method) :定义一个用于创建对象的接口,让子类决定实例化哪一个类。抽象工厂模式(Abstract Factory) :提供一个创建一系列相关或相互依赖对象的接口,而无需指定它们具体的类。建造者模式(Builder) :将一个复杂对象的构建与它的表示分离,使得同样的构建过程可以创建不同的表示。原型模式(Prototype) :通过复制现有的实例来创建新的实例,而不是通过新建类。
二、结构型设计模式 结构型设计模式关注于类和对象的组合,用于形成更大的结构,以解决如何将对象和类组合成较大的结构,同时保持结构的灵活和高效。
特点 :
通过组合和继承等方式,将对象或类组合成更大的结构。
强调对象之间的静态关系,以及如何通过不同的组合方式获得更加灵活的程序结构。
常见模式 :
适配器模式(Adapter) :将一个类的接口转换成客户期望的另一个接口。桥接模式(Bridge) :将抽象部分与实现部分分离,使它们可以独立变化。组合模式(Composite) :将对象组合成树形结构以表示“部分-整体”的层次结构。装饰器模式(Decorator) :动态地给一个对象添加一些额外的职责。外观模式(Facade) :提供一个统一的接口,用来访问子系统中的一群接口。享元模式(Flyweight) :运用共享技术有效地支持大量细粒度的对象。代理模式(Proxy) :为其他对象提供一种代理以控制对这个对象的访问。
三、行为型设计模式 行为型设计模式特别关注对象之间的通信,以及如何通过对象之间的协作来实现特定的功能。
特点 :
强调对象之间的动态关系,以及如何通过对象之间的交互来实现特定的行为。
通过定义对象之间的交互规则和通信方式,使得系统更加灵活和可扩展。
常见模式 :
责任链模式(Chain of Responsibility) :为请求创建一个接收者对象的链。命令模式(Command) :将一个请求封装为一个对象,从而使你可用不同的请求对客户进行参数化。解释器模式(Interpreter) :给定一个语言,定义它的文法的一种表示,并定义一个解释器,这个解释器使用该表示来解释语言中的句子。迭代器模式(Iterator) :提供一种方法顺序访问一个聚合对象中各个元素,而又不暴露其内部的表示。中介者模式(Mediator) :用一个中介对象来封装一系列的对象交互。备忘录模式(Memento) :在不破坏封装的前提下,捕获并保存一个对象的内部状态,以便在将来的时间点上恢复对象到这个状态。观察者模式(Observer) :定义对象间的一种一对多的依赖关系,当一个对象的状态发生改变时,所有依赖于它的对象都得到通知并被自动更新。状态模式(State) :允许一个对象在其内部状态改变时改变它的行为。策略模式(Strategy) :定义一系列的算法,把它们一个个封装起来,并使它们可相互替换。模板方法模式(Template Method) :定义一个操作中的算法的骨架,而将一些步骤延迟到子类中。访问者模式(Visitor) :表示一个作用于某对象结构中的各元素的操作,它使你可以在不改变各元素的类的前提下定义作用于这些元素的新操作。
综上所述,C++中的创建型、结构型和行为型设计模式各具特点,分别关注于对象的创建、组合以及对象之间的通信和协作。这些设计模式在软件开发中具有重要的应用价值,可以帮助开发者编写更加清晰、可维护和可扩展的代码。
2.设计模式三大原则 设计模式的三大原则通常指的是开闭原则 (Open/Closed Principle)、里氏替换原则 (Liskov Substitution Principle)和依赖倒置原则 (Dependency Inversion Principle),它们是面向对象设计的基本原则,旨在提高代码的灵活性、可维护性和可扩展性。以下是这三个原则的清晰简洁解释:
开闭原则(Open/Closed Principle)
:
解释 :软件实体(类、模块、函数等)应该对扩展开放,对修改关闭。这意味着当需要添加新功能时,应该通过扩展现有代码(例如添加新类、新接口等)来实现,而不是修改已有代码。目的 :提高代码的灵活性和可维护性,减少因修改已有代码而引入的潜在错误。
里氏替换原则(Liskov Substitution Principle)
:
解释 :子类必须能够替换它们的基类而不会导致程序出错。这要求子类必须完全遵守基类所定义的接口契约,即子类在替换基类时,其行为应该与基类保持一致。目的 :确保系统的稳定性和可靠性,避免子类破坏基类的行为预期。
依赖倒置原则(Dependency Inversion Principle)
:
解释 :高层模块不应该依赖于低层模块,二者都应该依赖于抽象。抽象不应该依赖于细节,细节应该依赖于抽象。这意味着在设计中,应该通过接口或抽象类来定义高层模块和低层模块之间的交互,而不是直接依赖于具体的实现类。目的 :降低模块之间的耦合度,提高系统的可扩展性和可维护性。通过依赖抽象而不是具体实现,可以更容易地在不改变高层模块的情况下替换低层模块的实现。
这三大原则共同构成了面向对象设计的基础,它们指导我们如何设计更加灵活、可维护和可扩展的软件系统。遵循这些原则,可以帮助我们避免常见的设计问题,提高代码的质量和可维护性。
3.单例模式 单例模式:一个类不管创建多少次对象,永远只能得到该类型的一个对象的实例
常用到的,比如日志模块,数据库模块
需要注意的五个点 :
1、需要将构造函数私有化,这样保证使用者无法通过构造函数创建新的单例对象
分为两类:
饿汉式单例模式:还没有获取实例对象,实例对象就已经产生了懒汉式单例模式:唯一的实例对象,直到第一次获取它的时候,才产生(初始化)
1.饿汉单例模式 饿汉单例模式 一定是线程安全的
**饿汉式单例模式在类加载时就创建实例。**这种方式的特点是线程安全,因为实例在类加载时就已经被初始化,而类加载是线程安全的(由类加载器保证)。此外,饿汉式单例模式的实现相对简单。然而,它的缺点是即使实例没有被使用,它也会在类加载时被创建,这可能会导致内存浪费。
创建步骤:
1.构造函数私有化 使得用户不能随意调用构造函数,没有那么轻易的创建对象的实例
2.定义一个唯一的类的实例对象(既然已经让用户难以调用构造函数,那么类应该提供这个唯一的实例化对象)
3.定义接口让用户有办法获取类的唯一实例化对象的方法,通常返回的都是指针类型
1 2 3 4 5 6 7 8 9 10 11 12 13 14 15 16 17 18 19 20 21 22 23 24 25 26 27 28 29 30 31 32 33 34 35 36 37 38 39 #include <iostream> #include <thread> #include <list> #include <mutex> #include <atomic> #include <queue> #include <condition_variable> using namespace std;class Singleton { public : static Singleton* getInstance () { return &instance; } private : static Singleton instance; Singleton () { } Singleton (const Singleton&) = delete ; Singleton& operator = (const Singleton&) = delete ; }; Singleton Singleton::instance; int main () Singleton* p1 = Singleton::getInstance (); Singleton* p2 = Singleton::getInstance (); Singleton* p3 = Singleton::getInstance (); cout << p1 << " " << p2 << " " << p3 << endl; return 0 ; }
2.懒汉单例模式 **懒汉式单例模式在首次使用时才创建实例。**这种方式的特点是实现了延迟加载,即只有在需要实例时才创建它,从而节省了内存。
把静态变量设置为指针,通过初始化为空的方式不去分配内存,直到使用时(调用get)才去分配内存。
创建步骤:
1.构造函数私有化 使得用户不能随意调用构造函数,没有那么轻易的创建对象的实例
2.定义一个唯一的类的实例对象(既然已经让用户难以调用构造函数,那么类应该提供这个唯一的实例化对象)
3.定义接口让用户有办法获取类的唯一实例化对象的方法,通常返回的都是指针类型
1 2 3 4 5 6 7 8 9 10 11 12 13 14 15 16 17 18 19 20 21 22 23 24 25 26 27 28 29 30 31 32 33 34 35 36 37 38 39 40 41 42 #include <iostream> #include <thread> #include <list> #include <mutex> #include <atomic> #include <queue> #include <condition_variable> using namespace std;class Singleton { public : static Singleton* getInstance () { if (instance == nullptr ) { instance = new Singleton (); } return instance; } private : static Singleton *instance; Singleton () { } Singleton (const Singleton&) = delete ; Singleton& operator = (const Singleton&) = delete ; }; Singleton* Singleton::instance = nullptr ; int main () Singleton* p1 = Singleton::getInstance (); Singleton* p2 = Singleton::getInstance (); Singleton* p3 = Singleton::getInstance (); cout << p1 << " " << p2 << " " << p3 << endl; return 0 ; }
然而,懒汉式单例模式在多线程环境下可能会出现线程安全问题,即多个线程可能会同时创建实例,导致违反单例原则。为了解决这个问题,可以在创建实例的方法上加上同步关键字(synchronized),但这会降低性能。
为了解决懒汉式单例模式在多线程环境下的线程安全问题和性能问题,可以采用双重检查锁定(Double-Checked Locking)和volatile关键字。双重检查锁定可以确保在创建实例时只进行一次同步操作,而volatile关键字可以确保变量的可见性和禁止指令重排序 ,从而避免在创建实例时出现线程安全问题。
4.线程安全的懒汉单例模式 **可重入函数:**这个函数还没执行完,可不可以再被调用一次
在单线程中不可能发生(除了递归),在多线程中可能,线程1还没运行完,线程2就来运行了
如果这个函数可以在多线程环境下直接运行而且不发生竞态条件,那就是可重入函数
而懒汉单例模式中,getIntance并不是线程安全的
线程1进去了,还没给instance赋值,时间片到了给了线程2,那线程2就给instance赋值了,所以不是可重入函数,所以懒汉单例模式并不是线程安全的
1.锁+双重判断 1 2 3 4 5 6 7 8 9 10 11 12 13 14 15 16 17 18 19 20 21 22 23 24 25 26 27 28 29 30 31 32 33 34 35 36 37 38 39 40 41 42 43 44 45 46 47 48 49 50 51 52 53 54 55 56 57 58 #include <iostream> #include <thread> #include <list> #include <mutex> #include <atomic> #include <queue> #include <condition_variable> using namespace std;mutex mtx; class Singleton { public : static Singleton* getInstance () { if (instance == nullptr ) { lock_guard<mutex> guard (mtx) ; if (instance == nullptr ) { instance = new Singleton (); } } return instance; } private : static Singleton * volatile instance; Singleton () { } Singleton (const Singleton&) = delete ; Singleton& operator = (const Singleton&) = delete ; }; Singleton* volatile Singleton::instance = nullptr ; int main () Singleton* p1 = Singleton::getInstance (); Singleton* p2 = Singleton::getInstance (); Singleton* p3 = Singleton::getInstance (); cout << p1 << " " << p2 << " " << p3 << endl; return 0 ; }
注意:1.不加volatile的默认情况下,线程会对代码数据段拷贝一份副本,自己看自己的副本,加上以后不拷贝副本,只要instance发生改变,所有线程都能立马看到它改变了
2.在下面初始化的时候也要加上volatile关键字
3.new具体步骤补充
开辟内存 :new 操作符首先为对象分配足够的内存空间。这是通过调用底层的内存分配函数(如 malloc,尽管在 C++ 中更常见的是使用 operator new)来完成的。这个步骤确保了对象有足够的空间来存储其数据成员。构造对象 :一旦内存被分配,new 操作符就会在该内存位置上调用类的构造函数来初始化对象。这是对象实际被“创建”或“构造”的时刻,它的数据成员被赋予初始值(如果有的话)。给 instance 赋值 :最后,new 操作符返回指向新构造对象的指针,这个指针随后被赋值给静态成员变量 instance。这一步是将新创建的对象与类的静态成员变量关联起来的关键。
2.简洁的线程安全懒汉单例模式 1 2 3 4 5 6 7 8 9 10 11 12 13 14 15 16 class Singleton { public : static Singleton* getInstance () { static Singleton instance; return &instance; } private : Singleton () { } Singleton (const Singleton&) = delete ; Singleton& operator = (const Singleton&) = delete ; };
在C++中,类的静态局部变量的内存确实在程序启动时就已经为其预留,但是变量的初始化会延迟到第一次执行到它所在的代码块,所以这也是一种懒汉单例模式
而函数静态局部变量的初始化,在汇编指令上已经自动添加线程互斥指令了,因此不用担心线程安全的问题
1 2 3 4 5 6 7 8 9 10 11 12 13 14 15 16 17 18 19 20 21 22 23 24 25 26 27 28 29 30 31 32 33 34 35 36 #include <iostream> #include <thread> #include <list> #include <mutex> #include <atomic> #include <queue> #include <condition_variable> using namespace std;class Singleton { public : static Singleton* getInstance () { static Singleton instance; return &instance; } private : Singleton () { } Singleton (const Singleton&) = delete ; Singleton& operator = (const Singleton&) = delete ; }; int main () Singleton* p1 = Singleton::getInstance (); Singleton* p2 = Singleton::getInstance (); Singleton* p3 = Singleton::getInstance (); cout << p1 << " " << p2 << " " << p3 << endl; return 0 ; }
5.简单工厂(Simple Factor)、工厂方法(Factory Method) 工厂模式:主要是封装了对象的创建操作
1.简单工厂 1 2 3 4 5 6 7 8 9 10 11 12 13 14 15 16 17 18 19 20 21 22 23 24 25 26 27 28 29 30 31 32 33 34 35 36 37 38 39 40 41 42 43 44 45 46 47 48 49 50 51 52 53 54 55 56 57 58 59 60 61 62 63 64 65 66 67 68 69 70 71 72 73 74 75 76 77 78 79 80 81 82 83 84 85 86 87 88 89 #include <iostream> #include <thread> #include <list> #include <mutex> #include <atomic> #include <queue> #include <condition_variable> #include <memory> using namespace std;class Car { public : Car (string name):_name(name){} virtual void show () 0 ; string _name; }; class BMW :public Car{ public : BMW (string name) :Car (name) {} void show () { cout << "获得了一辆宝马汽车" << _name << endl; } }; class Audi :public Car{ public : Audi (string name) :Car (name) {} void show () { cout << "获得了一辆奥迪汽车" << _name <<endl; } }; enum CarType { Bmw, AUDI }; class SimpleFactory { public : Car* createCar (CarType ct) { switch (ct) { case Bmw: return new BMW ("X1" ); case AUDI: return new Audi ("A6" ); default : cerr << "传入工厂的参数不正确:" << ct << endl; break ; } return nullptr ; } }; int main () unique_ptr<SimpleFactory> factory (new SimpleFactory()) ; unique_ptr<Car> p1 (factory->createCar(Bmw)) ; unique_ptr<Car> p2 (factory->createCar(AUDI)) ; p1->show (); p2->show (); return 0 ; }
该例子中使用SimpleFactory类封装两个汽车类的创建操作
一共2种使用方法,即代码中的2种,直接用或者通过智能指针间接用
简单工厂模式(Simple Factory)的缺点主要包括以下几个方面:
违反开闭原则
开闭原则要求软件实体(类、模块、函数等)应该是可扩展的,但不可修改的。然而,在简单工厂模式中,每当需要增加新的产品时,都需要修改工厂类中的判断逻辑,从而违反了开闭原则。
高内聚问题
简单工厂模式中的工厂类通常负责所有产品的创建,这导致工厂类的职责过重,不符合高内聚的原则。高内聚要求一个模块或类应该只负责一个功能或一个紧密相关的功能集合。
不利于扩展和维护
由于简单工厂模式中的工厂类集中了所有产品的创建逻辑,随着产品种类的增加,工厂类的逻辑将变得越来越复杂,不利于系统的扩展和维护。
当需要添加新产品时,需要修改工厂类的代码,这增加了代码的维护成本。
测试困难
在简单工厂模式中,由于工厂类与具体产品类之间存在紧密的耦合关系,这增加了单元测试的难度。为了测试某个具体产品类,可能需要先实例化工厂类,并调用其创建方法,这可能会引入不必要的依赖和复杂性。
缺乏灵活性
简单工厂模式通常使用静态方法或全局方法来创建对象,这限制了对象的创建方式和灵活性。例如,在某些情况下,可能需要使用不同的创建策略或根据不同的上下文创建不同的对象实例,但简单工厂模式无法提供这种灵活性。
所以有了工厂方法和抽象工厂
2.工厂方法 1 2 3 4 5 6 7 8 9 10 11 12 13 14 15 16 17 18 19 20 21 22 23 24 25 26 27 28 29 30 31 32 33 34 35 36 37 38 39 40 41 42 43 44 45 46 47 48 49 50 51 52 53 54 55 56 57 58 59 60 61 62 63 64 65 66 67 68 69 70 71 72 73 74 75 76 #include <iostream> #include <thread> #include <list> #include <mutex> #include <atomic> #include <queue> #include <condition_variable> #include <memory> using namespace std;class Car { public : Car (string name):_name(name){} virtual void show () 0 ; string _name; }; class BMW :public Car{ public : BMW (string name) :Car (name) {} void show () { cout << "获得了一辆宝马汽车" << _name << endl; } }; class Audi :public Car{ public : Audi (string name) :Car (name) {} void show () { cout << "获得了一辆奥迪汽车" << _name <<endl; } }; class Factory { public : virtual Car* createCar (string name) 0 ; }; class BMWFactory :public Factory{ public : Car* createCar (string name) { return new BMW (name); } }; class AudiFactory :public Factory{ public : Car* createCar (string name) { return new Audi (name); } }; int main () unique_ptr<Factory> bmwfty (new BMWFactory()) ; unique_ptr<Factory> audifty (new AudiFactory()) ; unique_ptr<Car> p1 (bmwfty->createCar("X6" )) ; unique_ptr<Car> p2 (audifty->createCar("A8" )) ; p1->show (); p2->show (); return 0 ; }
Factory的纯虚函数就是工厂方法
其实就是对每个类有又单独创建了一个创建它的对象的类,就相当于封装了
1.完成了对对象的封装操作
2.贴合了软件的开闭原则(对原来已有的功能封闭,对扩展新功能开放)
一个工厂对应了一个类的创建,如果类很多的话会导致工厂也很多
缺点:灵活性受限
工厂方法模式通常用于创建单个产品对象,如果需要创建多个相关或依赖的产品对象,可能需要使用其他模式(如抽象工厂模式)来替代。
6.抽象工厂(Abstract Factory) 对有一组关联关系的产品簇提供产品对象的统一创建
1 2 3 4 5 6 7 8 9 10 11 12 13 14 15 16 17 18 19 20 21 22 23 24 25 26 27 28 29 30 31 32 33 34 35 36 37 38 39 40 41 42 43 44 45 46 47 48 49 50 51 52 53 54 55 56 57 58 59 60 61 62 63 64 65 66 67 68 69 70 71 72 73 74 75 76 77 78 79 80 81 82 83 84 85 86 87 88 89 90 91 92 93 94 95 96 97 98 99 100 101 102 103 104 105 106 107 108 109 110 #include <iostream> #include <thread> #include <list> #include <mutex> #include <atomic> #include <queue> #include <condition_variable> #include <memory> using namespace std;class Car { public : Car (string name):_name(name){} virtual void show () 0 ; string _name; }; class BMW :public Car{ public : BMW (string name) :Car (name) {} void show () { cout << "获得了一辆宝马汽车" << _name << endl; } }; class Audi :public Car{ public : Audi (string name) :Car (name) {} void show () { cout << "获得了一辆奥迪汽车" << _name <<endl; } }; class Light { public : virtual void show () 0 ; }; class BmwLight :public Light{ public : void show () " BMW Light" << endl; } }; class AudiLight :public Light{ public : void show () " Audi Light" << endl; } }; class AbstractFactory { public : virtual Car* createCar (string name) 0 ; virtual Light* createCarLight () 0 ; }; class BMWFactory :public AbstractFactory{ public : Car* createCar (string name) { return new BMW (name); } Light* createCarLight () { return new BmwLight (); } }; class AudiFactory :public AbstractFactory{ public : Car* createCar (string name) { return new Audi (name); } Light* createCarLight () { return new AudiLight (); } }; int main () unique_ptr<AbstractFactory> bmwfty (new BMWFactory()) ; unique_ptr<AbstractFactory> audifty (new AudiFactory()) ; unique_ptr<Car> p1 (bmwfty->createCar("X6" )) ; unique_ptr<Car> p2 (audifty->createCar("A8" )) ; unique_ptr<Light> l1 (bmwfty->createCarLight()) ; unique_ptr<Light> l2 (audifty->createCarLight()) ; p1->show (); p2->show (); l1->show (); l2->show (); return 0 ; }
缺点:不支持单一产品的变化
抽象工厂模式适用于一组相关产品的创建,但如果只有一个产品发生变化,那么整个工厂都需要进行修改,可能不够灵活。
其他的类甚至也要重写AbstractFactory里面新加的这个产品,不然自己的类会变成虚函数,但是实际上其他类本身也不提供这个产品(比如宝马课程生产一个螺丝奥迪可能就没有,这个时候就挺尴尬)
小结:
简单工厂 Simple Factory :
**优点:**把对象的创建封装在一个接口函数里面,通过传入不同的标识,返回创建的对象
客户不用自己负责new对象,不用了解对象创建的详细过程
**缺点:**提供创建对象实例的接口函数不闭合,不能对修改关闭
工厂方法 Factory Method
**优点:**Factory基类,提供了一个纯虚函数(创建产品),定义派生类(具体产品的工厂)负责创建对应的
产品,可以做到不同的产品,在不同的工厂里面创建,能够对现有工厂,以及产品的修改关闭
**缺点:**实际上,很多产品是有关联关系的,属于一个产品簇,不应该放在不同的工厂里面去创建,这样
一是不符合实际的产品对象创建逻辑,二是工厂类太多了,不好维护
抽象工厂 Abstract Factory
**优点:**把有关联关系的,属于一个产品簇的所有产品创建的接口函数,放在一个抽象工厂里面AbstractFactroy,派生类(具体产品的工厂)应该负责创建该产品簇里面所有的产品
**缺点:**抽象工厂模式适用于一组相关产品的创建,但如果只有一个产品发生变化,那么整个工厂都需要进行修改,可能不够灵活。
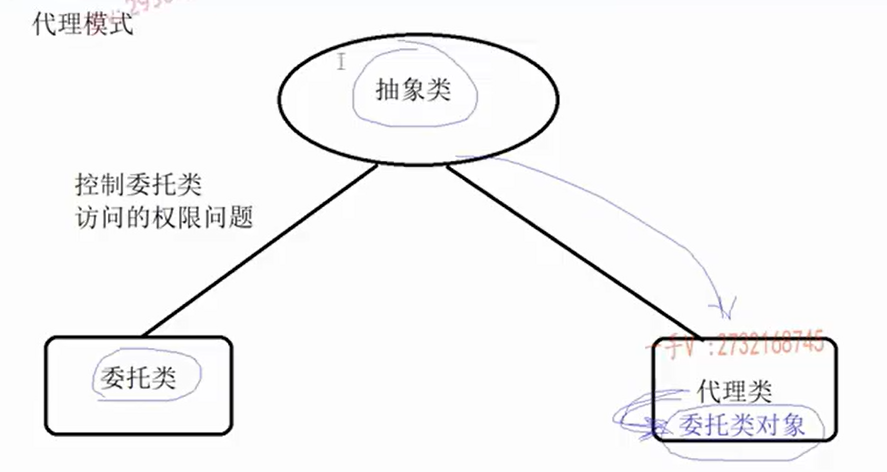
7.代理模式(Proxy) 通过代理类,来控制实际对象的访问权限
代理模式(Proxy Pattern) 是一种结构型设计模式,它提供一个对象的代理,以控制对这个对象的访问。代理对象作为客户端和目标对象之间的中介,客户端通过代理对象间接地访问目标对象。代理模式常用于延迟加载、访问控制、缓存等功能。
优点
隐藏实现细节 :客户端通过代理对象访问目标对象,不需要知道目标对象的具体实现。增强目标对象 :可以在不修改目标对象代码的情况下,为目标对象添加额外的功能。控制访问 :可以对目标对象的访问进行权限控制。减少系统开销 :例如,通过代理实现延迟加载,减少系统资源的消耗。
缺点
性能损耗 :代理对象会增加一层调用开销,虽然这个开销通常很小,但在高性能要求的场景下可能会成为瓶颈。代码复杂度增加 :引入代理模式后,系统的代码复杂度会增加。
步骤:
1.抽象公共类
2.委托类(继承自公共类)
3.代理类(继承自公共类)
4.以组合的方式使用代理对象
5.客户直接访问代理对象 相当于客户只能访问助理,不能直接访问老板
1 2 3 4 5 6 7 8 9 10 11 12 13 14 15 16 17 18 19 20 21 22 23 24 25 26 27 28 29 30 31 32 33 34 35 36 37 38 39 40 41 42 43 44 45 46 47 48 49 50 51 52 53 54 55 56 57 58 59 60 61 62 63 64 65 66 67 68 69 70 71 72 73 74 75 76 77 78 79 80 81 82 83 84 85 86 87 88 89 90 91 92 93 94 95 96 97 98 99 100 101 102 103 104 105 106 107 108 109 110 111 112 113 114 #include <iostream> #include <thread> #include <list> #include <mutex> #include <atomic> #include <queue> #include <condition_variable> #include <memory> using namespace std;class VideoSite { public : virtual void freeMovie () 0 ; virtual void vipMovie () 0 ; virtual void ticketMovie () 0 ; }; class FixBugVideoSite :public VideoSite{ public : virtual void freeMovie () { cout << "观看免费电影" << endl; } virtual void vipMovie () { cout << "观看vip电影" << endl; } virtual void ticketMovie () { cout << "用券观看电影" << endl; } }; class FreeVideoSiteProxy :public VideoSite{ public : FreeVideoSiteProxy () { pVideo = new FixBugVideoSite (); } ~FreeVideoSiteProxy () { delete pVideo; } virtual void freeMovie () { pVideo->freeMovie (); } virtual void vipMovie () { cout << "您目前只是普通用户,需要升级VIP才能观看VIP电影" << endl; } virtual void ticketMovie () { cout << "您目前没有券,需要购买电影券才能观看该电影" << endl; } private : VideoSite* pVideo; }; class VipVideoSiteProxy :public VideoSite{ public : VipVideoSiteProxy () { pVideo = new FixBugVideoSite (); } ~VipVideoSiteProxy () { delete pVideo; } virtual void freeMovie () { pVideo->freeMovie (); } virtual void vipMovie () { pVideo->vipMovie (); } virtual void ticketMovie () { cout << "您目前没有券,需要购买电影券才能观看该电影" << endl; } private : VideoSite* pVideo; }; void watchMovice (unique_ptr<VideoSite> &ptr) ptr->freeMovie (); ptr->vipMovie (); ptr->ticketMovie (); } int main () VideoSite* p1 = new FixBugVideoSite (); p1->freeMovie (); p1->vipMovie (); p1->ticketMovie (); unique_ptr<VideoSite> p2 (new FreeVideoSiteProxy()) ; watchMovice (p2); unique_ptr<VideoSite> p3 (new VipVideoSiteProxy()) ; watchMovice (p3); return 0 ; }
类和接口的说明:
VideoSite :这是一个抽象基类,定义了三个纯虚函数freeMovie、vipMovie和ticketMovie,分别代表观看免费电影、VIP电影和用券观看电影的功能。这个类作为所有视频站点(包括代理和委托)的接口。FixBugVideoSite :这是VideoSite的一个具体实现,即委托类。它实现了所有三个虚函数,分别输出相应的观看信息。这个类代表了一个实际的视频站点,提供了观看电影的具体功能。FreeVideoSiteProxy 和VipVideoSiteProxy :这两个类都是VideoSite的代理类。它们各自持有一个指向VideoSite(实际上是FixBugVideoSite)的指针,用于在需要时调用委托类的功能。代理类通过重写虚函数来控制对委托类功能的访问,例如,普通用户(FreeVideoSiteProxy)不能观看VIP电影或用券观看电影,而VIP用户(VipVideoSiteProxy)则可以观看VIP电影,但仍然不能用券观看(在这个例子中,VIP用户是否能用券观看取决于代理类的实现,这里简单地限制了)。
委托类和代理类的虚函数都是一样的,都是抽象类里面的函数
代理类经过检查发现不合法,没有权限,就不会调用委托类对象
8.装饰器模式 装饰器模式:主要是增加现有类的功能
为了增强现有类的功能,通过实现子类的方式,重写接口,是可以完成功能扩展的,但是代码中有太多的子类添加进来了
**装饰器模式(Decorator Pattern)**是一种结构型设计模式,它允许你向一个现有的对象添加新的功能,同时又不改变其结构。装饰器模式通过创建一个包装对象(即装饰器)来包裹原始对象,从而可以在运行时动态地给对象添加职责。
优点
灵活性 :可以在不修改原有类的情况下增加新的功能。扩展性 :通过组合而非继承来扩展功能,避免了继承带来的高耦合和代码膨胀问题。复用性 :装饰器和具体组件可以独立变化,互不干扰。
缺点
装饰链复杂 :如果装饰链太长,调试和维护会变得复杂。性能 :因为每次调用都会通过多个装饰器,可能会有一定的性能开销。
1 2 3 4 5 6 7 8 9 10 11 12 13 14 15 16 17 18 19 20 21 22 23 24 25 26 27 28 29 30 31 32 33 34 35 36 37 38 39 40 41 42 43 44 45 46 47 48 49 50 51 52 53 54 55 56 57 58 59 60 61 62 63 64 65 66 67 68 69 70 71 72 73 74 75 76 77 78 79 80 81 82 83 84 85 86 87 88 89 90 91 92 93 94 95 96 97 98 99 100 101 102 103 104 105 106 107 108 109 110 111 112 113 114 #include <iostream> #include <thread> #include <list> #include <mutex> #include <atomic> #include <queue> #include <condition_variable> #include <memory> using namespace std;class Car { public : virtual void show () 0 ; }; class Bmw :public Car{ public : void show () { cout << "这是一辆宝马汽车,配置有:基类配置" ; } }; class Audi :public Car{ public : void show () { cout << "这是一辆奥迪汽车,配置有:基类配置" ; } }; class Benz :public Car{ public : void show () { cout << "这是一辆奔驰汽车,配置有:基类配置" ; } }; class CarDecorator :public Car{ public : CarDecorator (Car* p) :pCar (p) {} private : Car* pCar; }; class ConcreteDecorator01 :public Car{ public : ConcreteDecorator01 (Car *p):pCar (p){} void show () { pCar->show (); cout << ",定速巡航" ; } private : Car* pCar; }; class ConcreteDecorator02 :public Car{ public : ConcreteDecorator02 (Car* p) :pCar (p) {} void show () { pCar->show (); cout << ",自动刹车" ; } private : Car* pCar; }; class ConcreteDecorator03 :public Car{ public : ConcreteDecorator03 (Car* p) :pCar (p) {} void show () { pCar->show (); cout << ",车道偏离" ; } private : Car* pCar; }; int main () Car* p1 = new ConcreteDecorator01 (new Bmw ()); p1 = new ConcreteDecorator02 (p1); p1 = new ConcreteDecorator03 (p1); p1->show (); cout << endl; Car* p2 = new ConcreteDecorator02 (new Audi ()); p2->show (); cout << endl; Car* p3 = new ConcreteDecorator03 (new Benz ()); p3->show (); cout << endl; return 0 ; }
9.代理和装饰的区别 C++中的装饰器模式(Decorator Pattern)和代理模式(Proxy Pattern)都是结构型设计模式,但它们在目的、功能扩展方式、结构修改以及关注点等方面存在显著的区别。
一、目的
装饰器模式 :主要用于动态地为对象添加额外的职责,而不改变其结构。它允许在不改变现有对象代码的情况下,通过创建一系列的装饰器类来增加、扩展或修改对象的功能。代理模式 :主要用于控制对其他对象的访问。它在客户端和实际对象之间引入了一个代理对象,客户端通过代理对象访问实际对象。代理对象可以用于控制访问权限、延迟加载、远程访问等。
二、功能扩展方式
装饰器模式 :通过组合多个装饰器类来实现功能扩展。每个装饰器类都实现了与被装饰对象相同的接口,并可以在调用接口方法之前或之后添加额外的行为。代理模式 :主要通过代理对象来控制访问,实际功能一般是由被代理对象提供的。代理对象可以在访问实际对象之前或之后添加额外的逻辑,如权限检查、日志记录等。
三、结构修改
装饰器模式 :通常不改变对象的结构,只是在其上添加装饰器。装饰器与被装饰对象具有相同的接口,因此可以替换或组合使用。代理模式 :虽然也引入了新的代理对象,但代理对象通常包含了额外的逻辑,这些逻辑在访问实际对象之前或之后执行。此外,代理模式可能会改变客户端与实际对象之间的交互方式。
四、关注点
装饰器模式 :关注于对象的功能增强。它允许在不修改现有代码的情况下,动态地为对象添加新的行为或功能。代理模式 :关注于对象的访问控制和管理。它提供了对实际对象访问的间接层,以便在访问过程中添加额外的逻辑或控制。
五、应用场景
装饰器模式 :
组件扩展:在大型项目中,随着业务的增加,需要添加新的功能时,装饰器可以避免修改原有的基础组件。
API增强:当提供API给第三方调用时,装饰器可以用于添加额外的功能,如日志记录、安全校验等。
权限管理:装饰器可以用来控制对原有特定接口的访问权限。
缓存机制:在网络请求或数据库查询等操作中,装饰器可以用来添加额外的缓存、重试、超时处理等功能。
代理模式 :
延迟加载:可以在需要时才创建实际对象,节省资源。
远程代理:用于控制对远程对象的访问,通常用于网络编程中。
保护代理:用于控制对对象的访问权限,增强安全性。
缓存/缓冲代理:用于缓存频繁访问的数据,以减少计算或网络请求的开销。
智能引用代理:用于管理对象的生命周期,确保对象在不再需要时被正确释放。
10.适配器模式 适配器模式:让不兼容的接口可以在一起工作
**适配器模式(Adapter Pattern)**是一种结构型设计模式,它允许接口不兼容的类一起工作。适配器模式将类的接口转换成客户端所期望的另一种接口形式,使得原本不兼容的类可以合作无间。
优点
提高灵活性 :通过适配器,客户端可以透明地访问不兼容的接口,提高了系统的灵活性。复用性 :适配器使得已有的类可以被复用,而无需修改它们的源代码。解耦 :适配器模式有助于将接口和实现解耦,使得系统更加模块化。
缺点
代码复杂度增加 :引入适配器会增加系统的代码量和复杂度。性能损耗 :在某些情况下,适配器可能会导致性能上的损耗,因为它需要在客户端和适配对象之间进行额外的转换。
1 2 3 4 5 6 7 8 9 10 11 12 13 14 15 16 17 18 19 20 21 22 23 24 25 26 27 28 29 30 31 32 33 34 35 36 37 38 39 40 41 42 43 44 45 46 47 48 49 50 51 52 53 54 55 56 57 58 59 60 61 62 63 64 65 66 67 68 69 70 71 72 73 74 75 76 77 78 79 80 81 82 83 84 85 86 87 88 #include <iostream> #include <thread> #include <list> #include <mutex> #include <atomic> #include <queue> #include <condition_variable> #include <memory> using namespace std;class VGA { public : virtual void play () 0 ; }; class TV01 :public VGA{ public : void play () { cout << "通过VGA接口连接投影仪,进行视频播放" << endl; } }; class Computer { public : void playVideo (VGA* pVGA) { pVGA->play (); } }; class HDMI { public : virtual void play () 0 ; }; class TV02 :public HDMI{ public : void play () { cout << "通过HDMI接口连接投影仪,进行视频播放" << endl; } }; class VGAToHDMTAdapter :public VGA{ public : VGAToHDMTAdapter (HDMI *p):pHdmi (p){} void play () { pHdmi->play (); } private : HDMI* pHdmi; }; int main () Computer computer; computer.playVideo (new TV01 ()); computer.playVideo (new VGAToHDMTAdapter (new TV02 ())); return 0 ; }
下面是对代码中各个部分的详细讲解:
抽象接口定义
VGA 和 HDMI 是两个抽象基类,分别定义了具有 play() 方法的接口。这两个接口代表两种不同的视频输出标准。
具体实现类
TV01 继承自 VGA ,表示一个支持VGA接口的投影仪,其 play() 方法实现了通过VGA接口播放视频的功能。TV02 继承自 HDMI ,表示一个支持HDMI接口的投影仪,其 play() 方法实现了通过HDMI接口播放视频的功能。
电脑类
Computer 类有一个方法 playVideo(VGA* pVGA),这个方法接受一个 VGA 接口的指针作为参数,并调用该指针的 play() 方法。这表示电脑只能通过VGA接口播放视频。
适配器类
VGAToHDMTAdapter 类继承自 VGA ,但它内部持有一个 HDMI 接口的指针。这个适配器类实现了 VGA 接口的 play() 方法,但在这个方法内部,它调用的是内部 HDMI 接口指针的 play() 方法。这样,VGAToHDMTAdapter 就起到了将HDMI接口转换为VGA接口的作用。
11.观察者模式 也称为监听者模式 或发布-订阅模式
它属于行为型模式 ,而行为型主要关注的是对象之间的通信
观察者模式 主要关注的是对象的一对多的关系,也就是多个对象都依赖一个对象,当该对象的状态发生改变时,其他对象都能接收到相应的通知
观察者模式(Observer Pattern)是一种行为设计模式,它定义了一种一对多的依赖关系,让多个观察者对象同时监听某一个主题对象。这个主题对象在状态发生变化时,会通知所有观察者对象,使它们能够自动更新自己。
优点
松耦合 :观察者和被观察者之间通过抽象接口进行交互,降低了它们之间的耦合度。灵活性 :观察者可以在任何时候增加或删除,而不会影响被观察者的行为。扩展性强 :可以在不修改被观察者代码的情况下增加新的观察者。
缺点
性能开销 :如果被观察者状态频繁变化,并且有很多观察者,那么通知所有观察者可能会带来较大的性能开销。内存泄漏风险 :如果没有正确管理观察者的生命周期,可能会导致内存泄漏。循环依赖 :观察者之间可能相互依赖,导致复杂的依赖关系网。
例如:
一组数据(数据对象),通过这一组数据生成 曲线图(对象1)/ 柱状图(对象2)/ 圆饼图(对象3)
当数据对象改变时,对象1,2,3应该及时收到相应的通知
Subject主题有更改的时候,应该及时通知相应的观察者,去处理相应的事件
1 2 3 4 5 6 7 8 9 10 11 12 13 14 15 16 17 18 19 20 21 22 23 24 25 26 27 28 29 30 31 32 33 34 35 36 37 38 39 40 41 42 43 44 45 46 47 48 49 50 51 52 53 54 55 56 57 58 59 60 61 62 63 64 65 66 67 68 69 70 71 72 73 74 75 76 77 78 79 80 81 82 83 84 85 86 87 88 89 90 91 92 93 94 95 96 97 98 99 100 101 102 103 104 105 106 107 108 109 110 111 112 113 114 115 116 117 118 119 120 121 122 123 124 125 126 127 128 129 130 #include <iostream> #include <thread> #include <list> #include <mutex> #include <atomic> #include <queue> #include <condition_variable> #include <memory> #include <unordered_map> #include <list> using namespace std;class Observer { public : virtual void handle (int msgid) 0 ; }; class Observer1 :public Observer{ public : void handle (int msgid) { switch (msgid) { case 1 : cout << "Observer1 recv 1 msg" << endl; break ; case 2 : cout << "Observer1 recv 2 msg" << endl; break ; default : cout << "Observer1 recv unkown msg" << endl; break ; } } }; class Observer2 :public Observer{ public : void handle (int msgid) { switch (msgid) { case 2 : cout << "Observer2 recv 2 msg" << endl; break ; default : cout << "Observer2 recv unkown msg" << endl; break ; } } }; class Observer3 :public Observer{ public : void handle (int msgid) { switch (msgid) { case 1 : cout << "Observer3 recv 1 msg" << endl; break ; case 3 : cout << "Observer3 recv 3 msg" << endl; break ; default : cout << "Observer3 recv unkown msg" << endl; break ; } } }; class Subject { public : void adObserver (Observer* obser, int msgid) { _subMap[msgid].push_back (obser); } void dispatch (int msgid) { auto it = _subMap.find (msgid); if (it != _subMap.end ()) { for (Observer* pObser : it->second) { pObser->handle (msgid); } } } private : unordered_map<int , list<Observer*>> _subMap; }; int main () Subject subject; Observer* p1 = new Observer1 (); Observer* p2 = new Observer2 (); Observer* p3 = new Observer3 (); subject.adObserver (p1, 1 ); subject.adObserver (p1, 2 ); subject.adObserver (p2, 2 ); subject.adObserver (p3, 1 ); subject.adObserver (p3, 3 ); int msgid = 0 ; for (;;) { cout << "输入消息id:" ; cin >> msgid; if (msgid == -1 ) break ; subject.dispatch (msgid); } return 0 ; }
当主题改变的时候,对消息关注的对象会收到通知
 微信
微信 支付宝
支付宝