C++项目 | 集群聊天服务器 | Json
Json介绍
Json是一种轻量级的数据交换格式(也叫数据序列化方式)。Json采用完全独立于编程语言的文本格式来存储和表示数据。简洁和清晰的层次结构使得 Json 成为理想的数据交换语言。 易于人阅读和编写,同时也易于机器解析和生成,并有效地提升网络传输效率。
我们知道TCP是字节流,所以我们需要把发送的消息数据给序列化,用的工具就是Json。
发送到对端再反序列化还原数据。
一个优秀的Json三方库
JSON for Modern C++ 是一个由德国大牛 nlohmann 编写的在 C++ 下使用的 JSON 库。
具有以下特点
1.直观的语法
2.整个代码由一个头文件组成 json.hpp,没有子项目,没有依赖关系,没有复杂的构建系统,使用起来非常方便
3.使用 C++ 11 标准编写
4.使用 json 像使用 STL 容器一样
5.STL 和 json 容器之间可以相互转换
严谨的测试:所有类都经过严格的单元测试,覆盖了 100% 的代码,包括所有特殊的行为。此外,还检查了 Valgrind 是否有内存泄漏。为了保持高质量,该项目遵循核心基础设施倡议(CII)的最佳实践
1.包含json头文件
在网络中,常用的数据传输序列化格式有XML,Json,ProtoBuf,在公司级别的项目中,大量的在使用
ProtoBuf作为数据序列化的方式,以其数据压缩编码传输,占用带宽小,同样的数据信息,是Json的
1/10,XML的1/20,但是使用起来比Json稍复杂一些,所以项目中我们选择常用的Json格式来打包传输
数据。
下面列举一些项目中用到的有关Json数据的序列化和反序列化代码,仅供参考!JSON for Modern
C++这个三方库的使用非常简单,如下所示:
1
2
| #include"json.hpp"
using json = nlohmann::json;
|
2.Json数据序列化
就是把我们想要打包的数据,或者对象,直接处理成Json字符串。
就是按照键值对,key-value对应的写就行。
1.普通数据序列化
1
2
3
4
5
6
7
8
9
10
11
12
13
| #include "json.hpp"
using json = nlohmann::json;
json js;
js["id"] = { 1 , 2 , 3 , 4 , 5 };
js["name"] = "zhang san";
js["msg"]["zhang san"] = "hello world";
js["msg"]["liu shuo"] = "hello china";
js["msg"] = {{"zhang san", "hello world"}, {"liu shuo", "hello china"}};
cout << js << endl;
|
上面js对象的序列化结果是:
1
| {"id":[1,2,3,4,5],msg":{"liu shuo":"hello china","zhang san":"hello world"},"name":"zhangsan"}
|
完整代码:
1
2
3
4
5
6
7
8
9
10
11
12
13
14
15
16
17
18
19
20
21
22
23
24
25
26
27
28
29
30
31
32
33
34
35
36
37
38
39
40
41
42
43
44
45
46
47
48
49
50
51
52
53
54
55
56
57
58
59
60
61
62
63
64
65
66
| #include"json.hpp"
using json = nlohmann::json;
#include<iostream>
#include<vector>
#include<map>
#include<string>
using namespace std;
void func1()
{
json js;
js["msg_type"] = 2;
js["from"] = "zhang san";
js["to"] = "li si";
js["msg"] = "hello,what are you doing now?";
cout<<js<<endl;
string sendBuf=js.dump();
cout<<sendBuf<<endl;
}
void func2()
{
json js;
js["id"] = { 1 , 2 , 3 , 4 , 5 };
js["name"] = "zhang san";
js["msg"]["zhang san"] = "hello world";
js["msg"]["liu shuo"] = "hello china";
js["msg"] = {{"zhang san", "hello world"}, {"liu shuo", "hello china"}};
cout << js << endl;
}
void func3()
{
json js;
vector<int> vec;
vec.push_back( 1 );
vec.push_back( 2 );
vec.push_back( 5 );
js["list"] = vec;
map<int, string> m;
m.insert({ 1 , "黄山"});
m.insert({ 2 , "华山"});
m.insert({ 3 , "泰山"});
js["path"] = m;
cout<<js<<endl;
}
int main()
{
func1();
func2();
func3();
return 0;
}
|
2.容器序列化
1
2
3
4
5
6
7
8
9
10
11
12
13
14
| json js;
vector<int> vec;
vec.push_back( 1 );
vec.push_back( 2 );
vec.push_back( 5 );
js["list"] = vec;
map<int, string> m;
m.insert({ 1 , "黄山"});
m.insert({ 2 , "华山"});
m.insert({ 3 , "泰山"});
js["path"] = m;
cout<<js<<endl;
|
强大到直接把C++ STL中的容器内容可以直接序列化成Json字符串,上面代码打印如下:
1
| {"list":[1,2,5],"path":[[1,"黄山"],[2,"华山"],[3,"泰山"]]}
|
完整代码:
1
2
3
4
5
6
7
8
9
10
11
12
13
14
15
16
17
18
19
20
21
22
23
24
25
26
27
28
29
30
31
32
33
34
35
36
37
38
39
40
41
42
43
44
45
46
47
48
49
50
51
52
53
54
55
56
57
58
59
60
61
62
63
64
65
66
| #include"json.hpp"
using json = nlohmann::json;
#include<iostream>
#include<vector>
#include<map>
#include<string>
using namespace std;
void func1()
{
json js;
js["msg_type"] = 2;
js["from"] = "zhang san";
js["to"] = "li si";
js["msg"] = "hello,what are you doing now?";
cout<<js<<endl;
string sendBuf=js.dump();
cout<<sendBuf<<endl;
}
void func2()
{
json js;
js["id"] = { 1 , 2 , 3 , 4 , 5 };
js["name"] = "zhang san";
js["msg"]["zhang san"] = "hello world";
js["msg"]["liu shuo"] = "hello china";
js["msg"] = {{"zhang san", "hello world"}, {"liu shuo", "hello china"}};
cout << js << endl;
}
void func3()
{
json js;
vector<int> vec;
vec.push_back( 1 );
vec.push_back( 2 );
vec.push_back( 5 );
js["list"] = vec;
map<int, string> m;
m.insert({ 1 , "黄山"});
m.insert({ 2 , "华山"});
m.insert({ 3 , "泰山"});
js["path"] = m;
cout<<js<<endl;
}
int main()
{
func1();
func2();
func3();
return 0;
}
|

3.Json数据反序列化
当从网络接收到字符串为Json格式,可以用JSON for Modern C++ 直接反序列化取得数据或者直接反序
列化出对象,甚至容器,强大无比!
1
2
3
4
5
6
7
8
9
10
11
12
13
14
15
16
17
18
19
20
21
| string jsonstr = js.dump();
cout<<"jsonstr:"<<jsonstr<<endl;
json js2 = json::parse(jsonstr);
string name = js2["name"];
cout << "name:" << name << endl;
vector<int> v = js2["list"];
for(int val : v)
{
cout << val << " ";
}
cout << endl;
map<int, string> m2 = js2["path"];
for(auto p : m2)
{
cout << p.first << " " << p.second << endl;
}
cout << endl;
|
完整代码:
1
2
3
4
5
6
7
8
9
10
11
12
13
14
15
16
17
18
19
20
21
22
23
24
25
26
27
28
29
30
31
32
33
34
35
36
37
38
39
40
41
42
43
44
45
46
47
48
49
50
51
52
53
54
55
56
57
58
59
60
61
62
63
64
65
66
67
68
69
70
71
72
73
74
75
76
77
78
79
80
81
82
83
84
85
86
87
88
89
90
91
92
93
94
95
96
97
98
99
| #include"json.hpp"
using json = nlohmann::json;
#include<iostream>
#include<vector>
#include<map>
#include<string>
using namespace std;
string func1()
{
json js;
js["msg_type"] = 2;
js["from"] = "zhang san";
js["to"] = "li si";
js["msg"] = "hello,what are you doing now?";
string sendBuf=js.dump();
return sendBuf;
}
string func2()
{
json js;
js["id"] = { 1 , 2 , 3 , 4 , 5 };
js["name"] = "zhang san";
js["msg"]["zhang san"] = "hello world";
js["msg"]["liu shuo"] = "hello china";
js["msg"] = {{"zhang san", "hello world"}, {"liu shuo", "hello china"}};
return js.dump();
}
string func3()
{
json js;
vector<int> vec;
vec.push_back( 1 );
vec.push_back( 2 );
vec.push_back( 5 );
js["list"] = vec;
map<int, string> m;
m.insert({ 1 , "黄山"});
m.insert({ 2 , "华山"});
m.insert({ 3 , "泰山"});
js["path"] = m;
string sendBuf=js.dump();
return sendBuf;
}
int main()
{
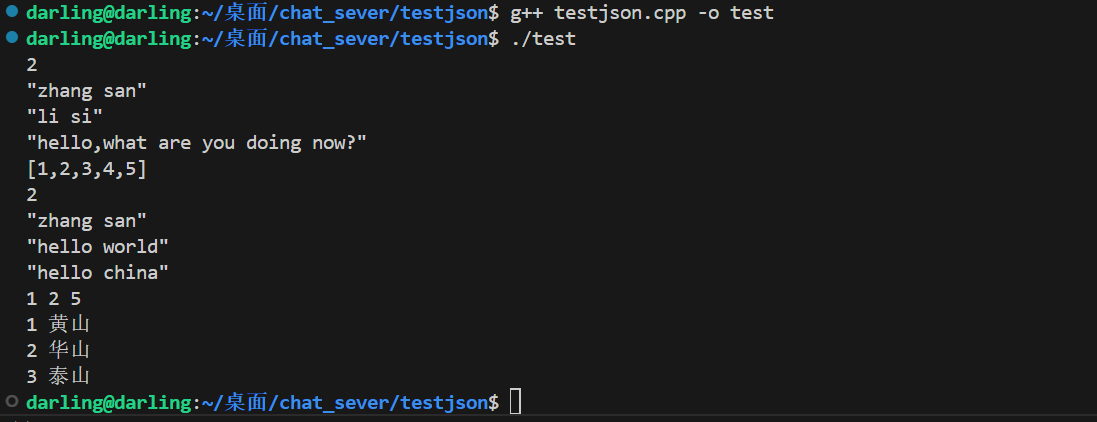
string recvBuf1=func1();
json jsbuf=json::parse(recvBuf1);
cout<<jsbuf["msg_type"]<<endl;
cout<<jsbuf["from"]<<endl;
cout<<jsbuf["to"]<<endl;
cout<<jsbuf["msg"]<<endl;
string recvBuf2=func2();
json jsbuf1=json::parse(recvBuf2);
cout<<jsbuf1["id"]<<endl;
auto arr=jsbuf1["id"];
cout<<arr[1]<<endl;
cout<<jsbuf1["name"]<<endl;
auto msgjs = jsbuf1["msg"];
cout<<msgjs["zhang san"]<<endl;
cout<<msgjs["liu shuo"]<<endl;
string recvBuf3=func3();
json jsbuf2=json::parse(recvBuf3);
vector<int> vec=jsbuf2["list"];
for(auto &c:vec)
cout<<c<<" ";
cout<<endl;
map<int,string>mymap=jsbuf2["path"];
for(auto &p:mymap)
cout<<p.first<<" "<<p.second<<endl;
return 0;
}
|
4.高级使用
1.使用自定义数据类型
1
2
3
4
5
6
7
8
9
10
11
12
13
14
15
16
17
18
19
20
21
22
23
24
25
26
27
28
29
30
31
32
33
34
35
36
37
38
39
40
41
42
43
| #include <iostream>
#include <nlohmann/json.hpp>
#include <vector>
#include <string>
using json = nlohmann::json;
struct Person {
std::string name;
int age;
bool is_student;
std::vector<int> numbers;
};
void to_json(json& j, const Person& p) {
j = json{{"name", p.name}, {"age", p.age}, {"is_student", p.is_student}, {"numbers", p.numbers}};
}
void from_json(const json& j, Person& p) {
j.at("name").get_to(p.name);
j.at("age").get_to(p.age);
j.at("is_student").get_to(p.is_student);
j.at("numbers").get_to(p.numbers);
}
int main() {
Person p{"Bob", 32, false, {10, 11, 12}};
json j = p;
std::cout << j << std::endl;
Person p2 = j.get<Person>();
std::cout << "Name: " << p2.name << std::endl;
std::cout << "Age: " << p2.age << std::endl;
std::cout << "Is student: " << p2.is_student << std::endl;
for (const auto& num : p2.numbers) {
std::cout << num << " ";
}
std::cout << std::endl;
return 0;
}
|
在上述代码中:
- 定义了一个
Person 结构体。
to_json 和 from_json 函数用于自定义 Person 结构体与 JSON 对象之间的转换。json j = p; 将 Person 对象转换为 JSON 对象。Person p2 = j.get<Person>(); 将 JSON 对象转换为 Person 对象。
2.迭代 JSON 对象和数组
1
2
3
4
5
6
7
8
9
10
11
12
13
14
15
16
17
18
19
20
21
22
23
24
| #include <iostream>
#include <nlohmann/json.hpp>
using json = nlohmann::json;
int main() {
json j = {
{"key1", "value1"},
{"key2", "value2"},
{"key3", {1, 2, 3}}
};
for (auto it = j.begin(); it!= j.end(); ++it) {
std::cout << it.key() << " : " << it.value() << std::endl;
}
for (const auto& element : j["key3"]) {
std::cout << element << " ";
}
std::cout << std::endl;
return 0;
}
|
在上述代码中:
for (auto it = j.begin(); it!= j.end(); ++it) 用于迭代 JSON 对象。for (const auto& element : j["key3"]) 用于迭代 JSON 数组。
5.错误处理
1
2
3
4
5
6
7
8
9
10
11
12
13
14
15
16
17
18
| #include <iostream>
#include <nlohmann/json.hpp>
using json = nlohmann::json;
int main() {
std::string jsonString = R"({
"name":"Invalid JSON"
"age":25
})";
try {
json j = json::parse(jsonString);
} catch (const json::parse_error& e) {
std::cerr << "Parse error at byte " << e.byte << ": " << e.what() << std::endl;
}
return 0;
}
|
在上述代码中:
- 当解析错误发生时,
json::parse_error 异常会被抛出,可以通过 catch 块来捕获和处理该异常。
 微信
微信 支付宝
支付宝