C++项目 | 集群聊天服务器 | moduo网络库 1.muduo网络库编程 1.muduo源码编译安装 muduo库源码编译安装和环境搭建,参考笔者的另外一篇博客:
在 Ubuntu 上安装 Muduo 网络库的详细指南_如何安装muduo库呢-CSDN博客
2.基于muduo的客户端服务器编程 muduo网络库的编程很容易,要实现基于muduo网络库的服务器和客户端程序,只需要简单的组合
TcpServer和TcpClient就可以,代码实现如下:
1 2 3 4 5 6 7 8 9 10 11 12 13 14 15 16 17 18 19 20 21 22 23 24 25 26 27 28 29 30 31 32 33 34 35 36 37 38 39 class ChatServer { public : ChatServer (muduo::net::EventLoop *loop, const muduo::net::InetAddress &listenAddr) : _server(loop, listenAddr, "ChatServer" ) { _server.setConnectionCallback (bind (&ChatServer::onConnection, this , _1)); _server.setMessageCallback (bind (&ChatServer::onMessage, this , _1, _2, _3)); _server.setThreadNum (10 ); } void start () { _server.start (); } private : void onConnection (const muduo::net::TcpConnectionPtr &con) void onMessage (const muduo::net::TcpConnectionPtr &con, muduo::net::Buffer *buf, muduo::Timestamp time) private : muduo::net::TcpServer _server; };
1 2 3 4 5 6 7 8 9 10 11 12 13 14 15 16 17 18 19 20 21 22 23 24 25 26 27 28 29 30 31 32 33 class ChatClient { public : ChatClient (muduo::net::EventLoop *loop, const muduo::net::InetAddress &addr) :_client(loop, addr, "ChatClient" ) { _client.setConnectionCallback (bind (&ChatClient::onConnection, this , _1)); _client.setMessageCallback (bind (&ChatClient::onMessage, this , _1, _2, _3)); } void connect () { _client.connect (); } private : void onConnection (const muduo::net::TcpConnectionPtr &con) void onMessage (const muduo::net::TcpConnectionPtr &con, muduo::net::Buffer *buf, muduo::Timestamp time) muduo::net::TcpClient _client; };
3.用muduo中的线程池做计算任务 采用muduo进行服务器编程,如果遇到需要开辟多线程单独来处理复杂的计算任务或者其它阻塞任务等,不需要直接调用pthread_create来创建线程,muduo库提供的ThreadPool线程池管理类已经把Linux的线程创建完全封装起来了,如果想研究源码,可以剖析muduo中ThreadPool.cc和Thread.cc。
ThreadPool使用示例:
1 2 3 void userClient (const muduo::net::TcpConnectionPtr &con) muduo::ThreadPool _pool;
1 2 3 4 5 6 7 8 9 10 11 12 13 if (con->connected ()) { LOG_INFO << "connect server success!" ; _pool.run (bind (&ChatClient::userClient, this , con)); } else { }
4.muduo的日志系统 在开发软件产品过程中,日志的输出非常重要,可以记录很多软件运行过程中的信息,方便定位调试问题,跟踪统计信息等等,muduo库提供的日志级别有:
1 2 3 4 5 6 7 8 9 10 11 12 13 14 15 16 #define LOG_TRACE if (muduo::Logger::logLevel() <= muduo::Logger::TRACE) \ muduo::Logger(__FILE__, __LINE__, muduo::Logger::TRACE, __func__).stream() #define LOG_DEBUG if (muduo::Logger::logLevel() <= muduo::Logger::DEBUG) \ muduo::Logger(__FILE__, __LINE__, muduo::Logger::DEBUG, __func__).stream() #define LOG_INFO if (muduo::Logger::logLevel() <= muduo::Logger::INFO) \ muduo::Logger(__FILE__, __LINE__).stream() #define LOG_WARN muduo::Logger(__FILE__, __LINE__, muduo::Logger::WARN).stream() #define LOG_ERROR muduo::Logger(__FILE__, __LINE__, muduo::Logger::ERROR).stream () #define LOG_FATAL muduo::Logger(__FILE__, __LINE__, muduo::Logger::FATAL).stream () #define LOG_SYSERR muduo::Logger(__FILE__, __LINE__, false).stream() #define LOG_SYSFATAL muduo::Logger(__FILE__, __LINE__, true).stream() LOG_INFO << "记录相应级别的日志信息" ;
2.muduo网络库的多线程模型 1.网络服务器编程常用模型 【方案1】 : accept + read/write
不是并发服务器
【方案2】 : accept + fork - process-pre-connection
适合并发连接数不大,计算任务工作量大于fork的开销
【方案3】 :accept + thread thread-pre-connection
比方案2的开销小了一点,但是并发造成线程堆积过多
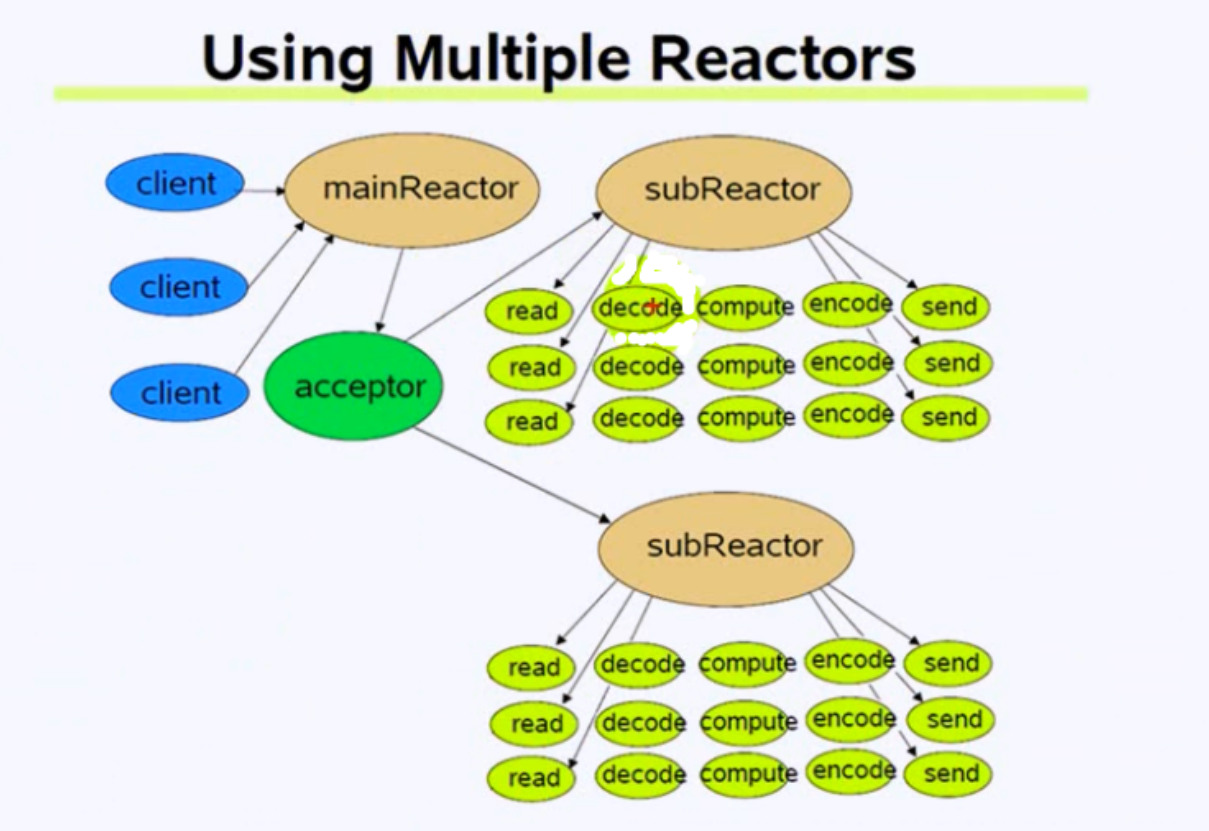
【方案4】: muduo的网络设计:reactors in threads - one loop per thread
方案的特点是one loop per thread,有一个main reactor负载accept连接,然后把连接分发到某个sub
reactor(采用round-robin的方式来选择sub reactor),该连接的所用操作都在那个sub reactor所处
的线程中完成。多个连接可能被分派到多个线程中,以充分利用CPU。
Reactor poll的大小是固定的,根据CPU的数目确定。
1 2 _server.setThreadNum ( 10 );
一个Base IO thread负责accept新的连接,接收到新的连接以后,使用轮询的方式在reactor pool中找
到合适的sub reactor将这个连接挂载上去,这个连接上的所有任务都在这个sub reactor上完成。
如果有过多的耗费CPU I/O的计算任务,可以提交到创建的ThreadPool线程池中专门处理耗时的计算任
务。
【方案5】 : reactors in process - one loop pre process
nginx服务器的网络模块设计,基于进程设计,采用多个Reactors充当I/O进程和工作进程,通过一把
accept锁,完美解决多个Reactors的“惊群现象”。
2.muduo中的reactor模型 reactor模型是什么?先看一下维基百科的标准解释:
The reactor design pattern is an event handling pattern for handling service requests delivered concurrently to a service handler by one or more inputs.
The service handler then demultiplexes the incoming requests and dispatches them synchronously to the associated request handlers.
从上面的描述,可以看出如下关键点:
事件驱动(event handling)
可以处理一个或多个输入源(one or more inputs)
通过Service Handler同步的将输入事件(Event)采用多路复用分发给相应的Request Handler(多个)处理
建议大家打开muduo的源码,从TcpServer的start方法开始,阅读一下muduo库的源码实现,理解mainReactor和subReactor的工作原理,这样对于该项目的面试问题,也能更深入的去表达muduo相关的内容。
3.具体的步骤和示例 1.muduo 网络库给用户提供了两个主要的类 TcpServer:用于编写服务器程序的
TcpClient:用于编写客户端程序的
2.epoll + 线程池 好处:能够把网络I/O的代码和业务代码区分开
只需要关注用户的连接和断开,用户的可读写事件这两件事情怎么做
至于什么时候做由网络库决定,如何监听这些事件也由网络库实现
3.基于muduo网络库开发服务器程序的具体步骤 1.组合TcpServer对象
2.创建EventLoop事件循环对象的指针
3.明确TcpServer构造函数需要什么参数,输出ChatServer的构造函数
4.在当前服务器类的构造函数当中,注册处理连接的回调函数和处理读写事件的回调函数
5.设置合适的服务端线程数量,muduo库会自己分配IO线程和work线程的
4.代码 1 2 3 4 5 6 7 8 9 10 11 12 13 14 15 16 17 18 19 20 21 22 23 24 25 26 27 28 29 30 31 32 33 34 35 36 37 38 39 40 41 42 43 44 45 46 47 48 49 50 51 52 53 54 55 56 57 58 59 60 61 62 63 64 65 66 67 68 69 70 71 72 73 74 #include <muduo/net/TcpServer.h> #include <muduo/net/EventLoop.h> #include <iostream> #include <string> using namespace std;using namespace muduo;using namespace muduo::net;using namespace placeholders;class ChatServer { public : ChatServer (EventLoop *loop, const InetAddress& listenAddr, const string& nameArg) :_server(loop,listenAddr,nameArg), _loop(loop) { _server.setConnectionCallback (std::bind (&ChatServer::onConnection,this ,_1)); _server.setMessageCallback (std::bind (&ChatServer::onMessage,this ,_1,_2,_3)); _server.setThreadNum (4 ); } void start () { _server.start (); } private : void onConnection (const TcpConnectionPtr& conn) { if (conn->connected ()) { cout<<conn->peerAddress ().toIpPort ()<<"->" << conn->localAddress ().toIpPort ()<<"state : online" <<endl; } else { cout<<conn->peerAddress ().toIpPort ()<<"->" << conn->localAddress ().toIpPort ()<<"state : offline" <<endl; conn->shutdown (); } } void onMessage (const TcpConnectionPtr& conn, Buffer* buffer, Timestamp time) { string buf=buffer->retrieveAllAsString (); cout<<"recv data:" <<buf<<"time:" <<time.toString ()<<endl; conn->send (buf); } TcpServer _server; EventLoop *_loop; }; int main () EventLoop loop; InetAddress addr ("127.0.0.1" ,8889 ) ; ChatServer server (&loop,addr,"Chatserver" ) ; server.start (); loop.loop (); return 0 ; }
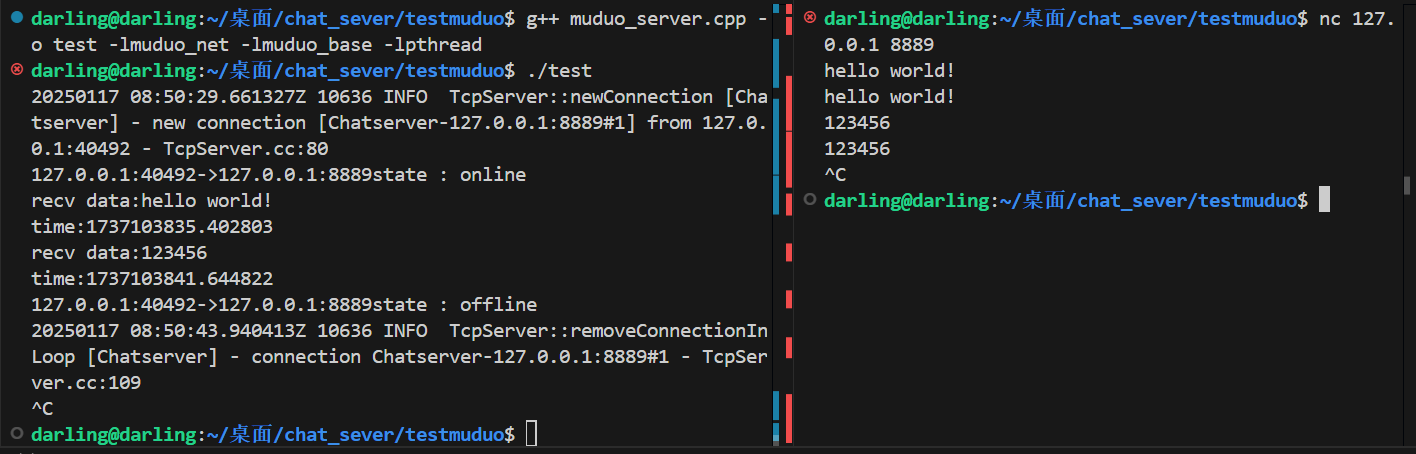
5.编译 1 g++ muduo_server.cpp -o test -lmuduo_net -lmuduo_base -lpthread
注意要按照net->base->thread的顺序,因为base会依赖net的东西
6.结果图
 微信
微信 支付宝
支付宝